This post may contain affiliate links. For more information, see our Affiliate Disclosure Policy.
By Callie
Chicken Bhuna is a North Indian curry where the word “bhuna” describes the cooking technique rather than the flavor profile: to bhuna is to slow-cook aromatics (onions, garlic, ginger, tomatoes, and spices) over medium heat until they reduce to a thick, concentrated, almost dry masala base where the oil visibly separates from the solids. This oil-separation moment – called “masala ready” in Hindi cooking – is the signal that the water content in the tomatoes and onions has evaporated, the sugars have caramelized, and the spices have fully bloomed in the remaining fat. The gravy that forms when the chicken and yogurt are added to this concentrated base is specifically thick and clingy – it coats every piece of chicken rather than surrounding it in a loose, watery sauce – and that coating quality is specifically what the chicken bhuna recipe is built to produce.
The recipe has two components that can be made independently of each other and well ahead of time: the bhuna masala (the whole-spice blend dry-roasted and ground) and the marination. The masala takes 10 minutes and keeps for months in a sealed jar, making every subsequent batch of this curry a simpler project. The marination takes 5 minutes and can happen for as little as 30 minutes or as long as overnight – the overnight-marinated chicken is specifically the most flavorful, most tender version because the acid in the lime juice and the salt’s osmotic effect work on the chicken’s proteins throughout the extended rest, and the spices penetrate more deeply into the meat.
My husband discovered this curry at an Indian restaurant and asked me to try making it at home. The third batch was the one he said was better than the restaurant version – not because I’d mastered some complex technique, but because the third batch was the one where I finally let the onions cook until they were deeply golden (not just golden, deeply golden) before adding the ginger and garlic. The timing difference between “golden” and “deeply golden” is approximately 4-5 additional minutes, and the flavor difference is specifically the depth that makes a bhuna taste like a bhuna rather than a generic curry. For the faster Indian-inspired chicken companion that uses an Instant Pot to compress the cooking time without sacrificing the layered flavor, the Indian Chicken Curry In Instant Pot is the pressure-cooker companion for weeknights when the slow bhuna technique isn’t the option available.
Why You Will Love This Chicken Bhuna
- The bhuna cooking technique specifically produces a thicker, more intensely flavored, more coating gravy than other curry methods because it evaporates the water content from the aromatics before the liquid is added. Most curry techniques: add onions, cook until soft (5-7 minutes), add spices, add tomatoes, add liquid, simmer. The result is a gravy with a significant water content from the undercooked onions, tomatoes, and liquid addition. Bhuna technique: cook the onion-spice-tomato-ginger-garlic base until all the visible moisture evaporates and the oil visibly separates from the masala solids. Only then is the chicken and yogurt added. The result: the gravy that forms is thick from the concentrated masala rather than thin from excess water. Every subsequent simmer of the dish reduces further rather than diluting, producing a progressively more concentrated, more specifically bhuna flavor as it cooks.
- Homemade bhuna masala from whole spices dry-roasted and freshly ground produces a specifically more complex, more aromatic spice blend than any pre-ground curry powder or store-bought masala mix. Whole spices retain their volatile aromatic compounds (the terpenes, eugenols, and cinnamaldehydes responsible for each spice’s specific character) within the seed or bark until ground. The dry-roasting step before grinding specifically activates and enhances these compounds by applying heat that converts some precursor compounds into more aromatic forms – the same Maillard-adjacent process that makes toasted spices more complex than raw ones. Grinding immediately before use: the aromatic compounds are at their most concentrated. Store-bought pre-ground spices: aromatic compounds have been degassing from the broken cell structure since grinding, producing a flatter, less specifically aromatic result. The 10 minutes to make bhuna masala from whole spices is the most significant flavor investment in the recipe.
- Bone-in chicken specifically (not boneless) produces both more flavorful meat and a richer gravy from the collagen and marrow that the bones release during the slow simmer. Bone-in chicken pieces: the bones contain collagen that converts to gelatin during the 10-minute covered simmer; this gelatin contributes to the gravy’s body and specifically helps the sauce adhere to the chicken pieces (gelatin is a natural emulsifier and thickener). Additionally, bone-in chicken’s collagen protects the meat from overcooking: the bone conducts heat more slowly than the surrounding meat, reducing the risk of the meat becoming dry while the gravy concentrates. Boneless thighs: acceptable, cook faster, easier to eat, but produce a specifically less rich, less thickened gravy. For the most authentic bhuna experience: bone-in leg pieces are specifically the correct choice.
- Kashmiri red chili powder provides color without the extreme heat of other red chili powders – it is the specific ingredient that produces bhuna’s characteristic deep red-orange color from relatively mild chili rather than from a very hot chili used in smaller quantity. Kashmiri chili (from the Kashmir region of India) is a mild, bright red chili with a specifically fruity, mildly warm character. The same deep red-orange color from a hotter chili (like cayenne) would require less quantity – producing less color depth – or require a very heat-tolerant palate. The Kashmiri chili allows generous use (2 teaspoons in this recipe) that produces a dramatically colored gravy and a warming but approachable heat level. Kashmiri chili powder is available at most Indian grocery stores and increasingly at Whole Foods and specialty grocery stores. Substitute if unavailable: paprika (mild, provides color without heat) or a combination of paprika and a small amount of cayenne (color plus some heat).
- Whisked yogurt added after lowering the heat, with continuous stirring, is the technique that incorporates the yogurt without curdling. Yogurt at high heat: the proteins in the yogurt (casein and whey) rapidly coagulate from the intense heat, producing small grainy curds that separate from the whey and make the sauce look broken rather than creamy. Yogurt added to a lowered-heat pan with continuous stirring: the stirring distributes the heat away from the yogurt’s proteins as they warm, preventing the rapid coagulation; the lower heat provides a gentler environment that allows the proteins to warm and integrate with the sauce without curdling. Whisked yogurt specifically (not cold-from-the-refrigerator yogurt straight into the pan): whisking removes air bubbles and produces a uniform consistency that distributes through the sauce more evenly than unwhisked yogurt, reducing the risk of lumps.
Chicken Bhuna Ingredients
Chicken And Marinade
- 1.5 pounds (680g) bone-in, skinless chicken leg pieces (drumsticks, thighs, or a combination)
- 1 teaspoon Kosher salt
- 1/2 teaspoon ground turmeric
- 1 teaspoon Kashmiri red chili powder
- Juice of 1/2 lime (approximately 1 tablespoon)
- Half of the freshly ground bhuna masala powder (see below)
Bhuna Masala (Whole Spice Blend)
- 1 tablespoon coriander seeds
- 1 teaspoon fennel seeds
- 1/2 teaspoon black peppercorns
- 4 cloves
- 1/2-inch piece of cinnamon stick
- 4 green cardamom pods
- 1/2 teaspoon shahi jeera (black cumin) or regular cumin seeds
Curry
- 2 tablespoons neutral cooking oil
- 2 tablespoons ghee (clarified butter – provides a specifically richer, more aromatic base than oil alone)
- 1 teaspoon cumin seeds
- 2 dried red chili peppers
- 1.5 cups (approximately 2 medium) yellow onions, finely chopped
- 1/2 tablespoon fresh ginger, grated
- 1/2 tablespoon fresh garlic, minced (approximately 3 cloves)
- 1 cup fresh tomatoes, pureed (approximately 2 medium tomatoes, blended)
- 1 teaspoon Kashmiri red chili powder, plus more to taste
- 1/4 cup whole milk yogurt, whisked until smooth and at room temperature
Garnish
- Fresh cilantro leaves, roughly chopped
- Fresh ginger, julienned into thin matchsticks
Ingredient Notes
Ghee vs oil: The combination of ghee and cooking oil in this recipe is specifically considered. Ghee (clarified butter from which the milk solids have been removed) has a higher smoke point than regular butter and a specifically rich, nutty, aromatic flavor that contributes to bhuna’s characteristic depth. Using only ghee: very rich, potentially too heavy. Using only oil: functional but lacking the ghee’s aromatic contribution. The combination produces a base that is rich and aromatic (from the ghee) without being specifically heavy (the oil balances the ghee’s richness).
Fresh vs canned tomatoes: Fresh tomatoes pureed in a blender produce a specifically brighter, more specifically fresh-tomato flavor in the gravy than canned tomatoes. Canned tomatoes (particularly whole peeled or crushed canned tomatoes) have a more cooked, slightly sweet, slightly acidic flavor from the canning process. For bhuna, where the tomatoes are cooked until very concentrated, either works well – but fresh tomatoes produce a more specifically vibrant color and a brighter flavor note in the concentrated masala. If fresh tomatoes are out of season and flavorless: use 3/4 cup of good-quality canned crushed tomatoes.
Shahi jeera (black cumin): Shahi jeera (Bunium persicum) is a different species from regular cumin (Cuminum cyminum) with a specifically more intense, slightly smoky, slightly more complex flavor. It’s available at Indian grocery stores. If unavailable: regular cumin seeds are a valid substitute; the flavor will be good but slightly less specifically complex.
Callie’s Kitchen Note: The “deeply golden onions” lesson that produced the third batch’s restaurant-quality result is specifically the cooking insight that applies across most Indian curry techniques: the onions are the foundation, and the quality of the curry is directly proportional to how long the onions have cooked. Most Western cooking instincts push toward “soft and golden” and then proceed to the next step. Indian bhuna cooking requires “dark golden-brown, fragrant, sweet, almost jammy” – a state that takes 12-15 minutes of medium-heat cooking rather than the 7-8 minutes that produces merely golden. The visual distinction: “golden” onions are clearly yellow-golden throughout; “deeply golden” onions are brown at the edges, amber in the center, reduced to approximately 60% of their original volume, and smell specifically sweet and caramelized rather than just savory. The 5 additional minutes is specifically the investment that converts adequate bhuna into excellent bhuna.

How To Make Chicken Bhuna
1- Make The Bhuna Masala (Freshly Ground Whole Spice Blend)
Place all the whole spices (coriander seeds, fennel seeds, black peppercorns, cloves, cinnamon stick, green cardamom pods, and shahi jeera/cumin seeds) in a dry skillet over low heat. Stir continuously for 3-5 minutes until the spices become noticeably more fragrant – you should be able to smell the difference between the raw-spice aroma and the toasted-spice aroma within 2 minutes, and by 3-5 minutes the aroma should be specifically warm, complex, and deeply fragrant. The cardamom will bloat slightly; the fennel seeds may darken minimally; the coriander seeds may jump slightly in the pan. Remove from heat immediately when the aroma tells you they’re ready – do not wait for visible darkening, as the residual heat continues toasting after removal.
Allow to cool for 2-3 minutes (grinding warm spices can cause moisture release that makes the powder clump). Transfer to a spice grinder or a dedicated coffee grinder. Grind until finely powdered – approximately 30-45 seconds of grinding for most spices, though the cinnamon stick’s fibrous bark may need an extra 15 seconds. The resulting powder should be fragrant and uniform. Set aside.
Why Dry-Roasting Whole Spices Specifically Matters For Bhuna
Each whole spice contains its aromatic compounds sealed within the seed’s or bark’s cell structure. Dry heat applied to the intact spice produces two effects simultaneously: the surface sugars and proteins undergo Maillard browning (adding caramelized depth), and the heat converts certain precursor aromatic compounds into their more aromatic final forms (a chemistry process called thermal decomposition that enhances flavor). Grinding immediately after roasting: the freshly broken cell walls release the aromatic compounds at their peak concentration. The smell of freshly ground roasted spices vs. pre-ground store-bought spices is the most direct evidence of this difference – the freshly ground version has a specifically more complex, more present aroma that translates directly to more present flavor in the finished dish.
2- Marinate The Chicken
In a large bowl: combine the bone-in chicken pieces with the salt, turmeric, Kashmiri red chili powder, lime juice, and half of the freshly ground bhuna masala powder. Toss to coat every piece of chicken thoroughly. Allow to marinate for at least 30 minutes at room temperature, or cover and refrigerate for up to 24 hours for the deepest flavor and most tender result.
The turmeric serves two purposes in the marinade: it provides a specific golden-yellow tint to the chicken’s surface (which shows through the final gravy’s color) and its curcumin content has a mild tenderizing effect on the muscle proteins. The lime juice’s acid similarly has a mild tenderizing effect by partially denaturing surface proteins. Both effects are more pronounced over longer marination time.
3- Sear The Chicken
Heat the 2 tablespoons of oil in a heavy-bottomed pan or Dutch oven over high heat until shimmering. Add the marinated chicken pieces in a single layer, working in batches if necessary to avoid crowding. Sear without moving for 3-4 minutes until the contact surface is lightly browned and the spice coating has caramelized slightly against the hot pan. This is specifically not a full sear to golden perfection – it’s a partial sear that adds some Maillard-browned depth to the chicken’s flavor without fully cooking the meat (which will finish cooking in the gravy). Remove the seared chicken to a plate and set aside.
Why Searing Before Adding To The Gravy Specifically Matters
The Maillard browning on the seared chicken’s surface produces flavor compounds (specifically, melanoidins and Strecker degradation products) that don’t form from gentle simmering in liquid. These compounds provide the specifically roasted, caramelized, savory-depth quality that distinguishes a bhuna from a boiled-in-sauce curry. The seared chicken also provides browned fond to the pan that becomes part of the ghee-and-spice base when the gravy is made – this fond is specifically more flavorful than the unseared pan’s surface.
Callie’s Kitchen Note: The “half the masala in the marinade, half in the curry” approach is the technique that produces both surface flavor (from the marinated masala that directly seasons the chicken) and depth flavor (from the masala added to the gravy where it blooms in fat). When I made an early batch where I added all the masala to the gravy and used none in the marinade: the chicken itself was milder, with most of the spice flavor existing in the gravy around it rather than in the chicken’s flesh. The half-and-half approach produces chicken that tastes specifically of bhuna masala throughout rather than only when surrounded by sauce – the difference between chicken in a curry and curry chicken, if that distinction makes sense.
4- Build The Bhuna Gravy
In the same heavy pan used for searing (leaving any fond in the pan): add the 2 tablespoons of ghee. Once the ghee is hot: add the cumin seeds and dried red chilies. Stir for 30-45 seconds until the cumin seeds darken slightly and begin to smell specifically toasted and nutty – this is the blooming process where the fat-soluble aromatic compounds in the cumin transfer into the hot ghee, perfuming the entire oil base with cumin’s warm, earthy, slightly bitter-sweet character. This 30-45 second step produces a cumin-infused ghee that flavors everything added to it subsequently.
Add the finely chopped onions. Cook on medium heat, stirring occasionally, for 12-15 minutes until the onions are deeply golden – not just golden, but specifically dark amber at the edges, reduced to approximately 60% of their original volume, and smelling specifically sweet and caramelized. This is the foundational step of bhuna cooking. The patience here is specifically the investment that produces bhuna quality. Add the grated ginger and minced garlic. Stir for 60 seconds until fragrant.
The Oil-Separation Signal – When The Masala Is Ready
Add the pureed tomatoes to the golden-onion base. Cook, stirring occasionally, for 5-6 minutes. During this time: the tomatoes will splutter and steam as their water content evaporates, the color will deepen from bright red to a darker, more brick-red, and the masala will visibly thicken. The signal that the masala is ready: the oil begins to visibly separate and pool at the edges and on the surface of the masala – small pools of oil or ghee visible around the thickened tomato-onion paste. This oil-separation tells you that the water has evaporated and the masala is now cooking in fat rather than in liquid, which is the specific condition that produces the concentrated, intense, coat-everything bhuna character. Do not add the chicken until you see the oil separating.
5- Combine, Add Yogurt, And Simmer
Return the seared chicken pieces to the pan. Add the remaining bhuna masala powder and the additional teaspoon of Kashmiri red chili powder. Stir to coat the chicken with the masala base. Now: lower the heat to its lowest setting. Add the whisked room-temperature yogurt to the pan gradually – not all at once, but in 2-3 additions, stirring constantly as you add each addition. The constant stirring prevents the yogurt’s proteins from encountering a single very hot point and curdling; adding in stages allows each addition to warm through gently before the next is added.
Continue stirring for 2-3 minutes until the yogurt is fully incorporated and the gravy looks uniformly creamy rather than showing any white streaks of yogurt or any grainy separation. Cover the pan and simmer on the lowest possible heat for 10 minutes, stirring once or twice during this time. The chicken should reach 165 degrees F at the thickest point of the bone-in pieces. Taste the gravy and adjust salt, chili heat, or lime juice as needed. Garnish with fresh cilantro and julienned ginger.
Callie’s Kitchen Note: My husband’s “better than the restaurant version” assessment on the third batch – specifically because the third batch had deeply golden onions rather than just golden ones – is the specific learning that makes sharing the bhuna cooking timeline important. The 12-15 minute onion cooking time is not excessive; it is specifically calibrated to produce the deeply golden state that makes the difference. Most recipes in this category say “cook onions until golden, about 7-8 minutes” – and that timing produces golden onions, which produce adequate bhuna. The 12-15 minutes to deeply golden produces the specific caramelized, sweet, concentrated onion base that the bhuna technique is designed around. I now set a timer for 12 minutes as a minimum and look for color rather than using the timer alone.
Common Mistakes To Avoid
Undercooking The Onions
The most impactful mistake. Golden-but-not-deeply-golden onions produce a curry with a more raw, less concentrated, less specifically sweet onion base. The bhuna technique is specifically built on the deeply caramelized onion base. Cook for 12-15 minutes on medium heat minimum, and look for the color and aroma indicators rather than just the timing.
Not Waiting For Oil Separation Before Adding Chicken
The oil-separation signal tells you the masala is ready – its water has evaporated and it’s now concentrated enough to coat the chicken rather than just surrounding it. Adding the chicken before oil separation: the masala is still too wet and will produce a thinner, less specifically bhuna-like gravy. Wait for the pools of oil visible at the edges and surface before proceeding.
Adding Yogurt At High Heat
Already addressed: high heat curdles the yogurt’s proteins. Lower to the lowest setting, whisk the yogurt before adding, add gradually in 2-3 stages, and stir continuously. The curdled version is still flavorful but loses the creamy quality that the yogurt is added specifically to produce.
Skipping The Marination
30 minutes minimum. Overnight for the best result. The marinade’s lime juice and salt both tenderize the chicken and allow the spices to begin penetrating the surface. Un-marinated chicken in the same recipe: milder flavor, less tender texture, missing the specifically bhuna-marinated quality that the masala-in-the-marinade approach produces.
Using Pre-Ground Curry Powder Instead Of Making The Bhuna Masala
Curry powder is a generic blend that does not replicate bhuna masala’s specific spice combination (heavy on coriander and fennel, with the specific cardamom-clove-cinnamon warmth that bhuna’s whole-spice blend produces). If making the freshly ground masala is not an option: use garam masala as the closest available substitute rather than curry powder – garam masala’s spice profile is closer to bhuna masala’s warm, aromatic character.
Callie’s Kitchen Note: The bhuna masala in this recipe (coriander seeds, fennel seeds, peppercorns, cloves, cinnamon, cardamom, shahi jeera) is a general masala that I’ve started using beyond this specific curry: a pinch added to roasted vegetables, a small amount stirred into a yogurt dip, a quarter-teaspoon added to ground meat for a specifically warming, aromatic depth. The masala made from a double batch of the whole spices and stored in a sealed jar keeps for 2-3 months and specifically improves any dish that benefits from warm, complex spice. Making the masala in bulk (4x this recipe) is a 15-minute investment that produces a pantry staple worth having consistently available.
Storage And Reheating
Refrigerator: In an airtight container for up to 4 days. Bhuna specifically improves during refrigerator storage – the flavors continue to meld and the gravy thickens further as it cools and the collagen from the bones continues to gel. Day-2 bhuna is specifically better than day-1 bhuna in most assessments.
Freezer: Up to 3 months in a freezer-safe container. Thaw overnight in the refrigerator. The gravy may look slightly separated after freezing – this is normal and resolves with reheating and stirring. The chicken’s texture is slightly different after freezing and thawing (the bone-in chicken holds up better to freezing than boneless would), but the flavor is maintained.
Stovetop reheating (best method): In a covered pan over low heat with 2-3 tablespoons of water added to loosen the thickened gravy. Stir occasionally until heated through. Taste and adjust seasoning – the flavors intensify during storage and the salt level may seem stronger; a small squeeze of lime juice or a few tablespoons of water can adjust the balance.
Microwave: In 30-second intervals, stirring between each, until warmed through. Add a small splash of water before microwaving to prevent the gravy from drying on the container walls.
Chicken Bhuna Variations
Lamb Bhuna
Replace the bone-in chicken with 1.5 pounds of bone-in lamb shoulder or leg pieces (cut into 2-inch pieces). Marinate identically. Sear identically. The key difference: lamb bhuna requires a longer simmer – 25-35 minutes covered rather than the 10 minutes for chicken. Lamb’s collagen and tougher muscle fibers need more time to break down and become tender. The reward: lamb bhuna has a specifically richer, more deeply savory, more specifically complex flavor than chicken bhuna – the lamb’s intramuscular fat contributes to the gravy in a way that chicken doesn’t. This is specifically the weekend version that requires the additional simmer time and produces a specifically more dramatic result.
Paneer Bhuna (Vegetarian)
Replace the chicken with 400g of paneer (Indian fresh cheese) cut into 1.5-inch cubes. Marinate in the same marinade but reduce the lime juice to 1/2 teaspoon (too much acid can break down the soft paneer). Sear the paneer cubes in oil until golden on all sides (approximately 2 minutes per side). Build the gravy identically. Add the seared paneer at the yogurt stage rather than before it, since paneer doesn’t need the 10-minute simmer that chicken requires (it’s already fully set during the searing). The paneer bhuna is the vegetarian version that maintains the bhuna technique and the spice profile in a satisfying, protein-rich format.
Creamy Bhuna With Coconut Milk
After the yogurt has been incorporated and the dish has simmered for 5 minutes: stir in 1/4 cup of full-fat coconut milk. Continue simmering for another 5 minutes. The coconut milk adds a specifically tropical, mildly sweet, creamy richness that moves the bhuna from specifically North Indian toward a South Indian or Thai-adjacent direction. The coconut milk’s fat also enriches the gravy further and softens the spice’s heat, making the coconut bhuna specifically more accessible for palates that find the standard version too assertive. This is a variation rather than an authentic direction – it’s delicious in its own right without claiming authentic status.
Serving Suggestions
With Naan Or Roti
The bhuna’s thick, clingy gravy is specifically designed for bread-based eating: the naan or roti is torn and used to scoop both the chicken and the adhering gravy. The bread’s mild, slightly chewy texture provides the neutral base that the intensely spiced gravy needs as a counterpoint. A freshly baked naan (from a restaurant or from a package warmed in a dry skillet or oven) alongside bhuna is specifically the combination that earns “we should order Indian food more often” – which in this household has been replaced by “we should make Indian food more often.”
With Basmati Rice And Raita
Jeera rice (basmati rice cooked with cumin seeds in the water) alongside the bhuna, with a small bowl of raita (whisked yogurt with grated cucumber, cumin, and salt) on the side. The raita’s cooling, plain yogurt character provides specifically the counterpoint to the bhuna’s intensity – each spoonful of bhuna followed by raita refreshes the palate and allows the next spoonful of bhuna to register its full flavor complexity rather than building to an overwhelming heat. This is the meal format that my husband requests specifically, and the one that is specifically the most satisfying complete Indian dinner format for a home cook.

Chicken Bhuna FAQ
The bhuna technique is specifically defined by the cooking method rather than the spice blend – it’s the process of slow-cooking the masala base until all the moisture evaporates and the oil separates before adding the protein. Most curries add liquid (water, stock, coconut milk) to produce a thinner, more flowing sauce. Bhuna avoids added liquid, using only the water content of the tomatoes and yogurt, and cooking even those down until the oil separates. The result: a thicker, more concentrated, more coating sauce than most curries. The word “bhuna” in a restaurant’s menu is the signifier of this specific technique and the specific thick-sauce quality it produces.
The most common cause: the masala wasn’t cooked long enough to reach oil separation before the chicken was added. The tomatoes contain significant water that needs to fully evaporate before the masala is concentrated enough to produce a thick gravy. If the current batch is already assembled and too watery: uncover the pan and simmer on medium heat, stirring frequently, until the desired consistency is reached. For subsequent batches: cook the tomato-onion masala for an additional 3-5 minutes beyond when it first looks thick, until oil visibly separates.
The sear and the gravy-building steps (onions, ginger-garlic, tomatoes) are best done on the saute setting first – these steps specifically require the time to reach the oil-separation stage, and the Instant Pot’s saute function produces this if given enough time (15-18 minutes on the saute function). After oil separation: add the chicken, spices, and yogurt, then pressure cook on high for 8-10 minutes with a 10-minute natural release. The Instant Pot version produces a very good bhuna, though the gravy may need an additional 5 minutes of saute (with lid off) after pressure cooking to reach the bhuna’s characteristic thick consistency.
Recipes You May Like
If this chicken bhuna has you building a collection of richly flavored, technique-driven, make-ahead-better braised and simmered chicken dishes that reward patience and proper technique with specifically restaurant-quality results, here are three more from the blog in the same spirit.
Indian Chicken Curry In Instant Pot – The faster companion that uses Indian curry’s core spices and technique in the pressure cooker format for weeknights when the bhuna’s full stovetop time isn’t available. Where the chicken bhuna requires 45-60 minutes of careful stovetop attention for the caramelized onion base and oil-separation stage, the Instant Pot curry compresses the process significantly without eliminating the layered flavor. Both are Indian chicken curries; the technique, the time investment, and the resulting gravy character are different.
Creamy Chicken Marsala – The Italian-braised companion that uses the same patient, fond-building, sauce-from-reduction approach in a completely different cultural direction. Where the chicken bhuna is aromatic, spiced, and specifically Indian, the chicken Marsala is wine-forward, mushroomy, and specifically Italian-American. Both reward patience during the sauce-building step; the flavor direction and the occasion are completely different.
Slow Cooker Chicken Cacciatore – The Italian-American companion that uses bone-in chicken pieces in a slow, sauce-saturating braise in the most hands-off format available. Where the chicken bhuna requires active stovetop attention for the masala-building stage, the slow cooker cacciatore requires 5-10 minutes of setup and then completely passive cooking. Both use bone-in chicken for the richest sauce; the technique, the flavor profile, and the effort level are completely different.
Conclusion
Chicken Bhuna earns “better than the restaurant version” from my husband specifically because of deeply golden onions (12-15 minutes on medium heat, not 7-8 minutes to just golden), oil separation before adding the chicken (the visual indicator that the masala is concentrated enough), and homemade bhuna masala from freshly dry-roasted and ground whole spices (the aromatic investment that no store-bought powder replicates). These three elements are the difference between an adequate curry and a specifically excellent bhuna.
Cook the onions until deeply golden. Wait for oil separation. Make the masala fresh. Add yogurt at low heat in stages. Set a 12-minute timer for the onions as a minimum. These instructions produce the bhuna that makes a household switch from “we should order Indian food” to “we should make Indian food.”
Tell me in the comments whether you tried the lamb bhuna variation or the paneer direction for a vegetarian version, and whether the deeply-golden-onion timing produced a noticeably different result from your previous just-golden-onion batches. Save this to Pinterest for your next special dinner, weekend cooking project, or any occasion that calls for the curry technique that rewards patience with specifically exceptional results – and happy cooking!
Happy cooking! – Callie
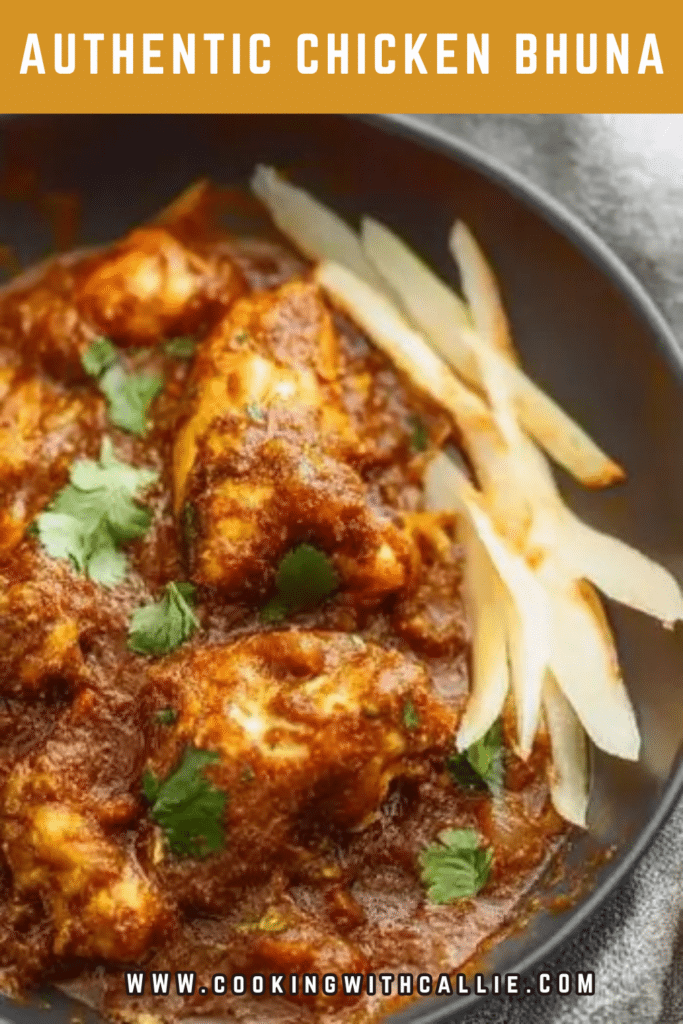

Authentic Chicken Bhuna Recipe – A Rich & Flavorful North Indian Curry

Chicken Bhuna is a rich and aromatic North Indian curry featuring bone-in chicken cooked in a thick, flavorful bhuna masala made from slow-cooked onions, tomatoes, and roasted spices. The deep, intense flavors come from the “bhuna” technique, which ensures that every bite is infused with bold, smoky, and spiced goodness. Perfect for pairing with naan or basmati rice, this dish is a must-try for anyone who loves authentic Indian cuisine.
- Prep Time: 20 minutes
- Cook Time: 35 minutes
- Total Time: 55 minutes
- Yield: 6 servings 1x
- Category: Main Course
- Method: Stovetop
- Cuisine: Indian
- Diet: Hindu
Ingredients
For the Chicken & Marinade:
- 1 ½ pounds bone-in, skinless chicken (preferably leg pieces)
- 1 teaspoon salt
- ½ teaspoon turmeric powder
- 1 teaspoon Kashmiri red chili powder
- ½ lime, juiced
For the Bhuna Masala (Spice Mix):
- 1 tablespoon coriander seeds
- 1 teaspoon fennel seeds
- ½ teaspoon black peppercorns
- 4 cloves
- ½ inch cinnamon stick
- 4 green cardamom pods
- ½ teaspoon shahi jeera (caraway seeds)
For the Curry:
- 2 tablespoons oil
- 2 tablespoons ghee
- 1 teaspoon cumin seeds
- 2 dried red chilies
- 1 ½ cups onions, finely chopped
- ½ tablespoon grated ginger
- ½ tablespoon minced garlic
- 1 cup tomato purée
- 1 teaspoon Kashmiri red chili powder (optional)
- ¼ cup whole milk yogurt, whisked
For Garnish:
- Fresh cilantro leaves, chopped
- Julienned ginger
Instructions
- Make the Bhuna Masala: Dry roast coriander seeds, fennel seeds, black peppercorns, cloves, cinnamon, cardamom, and shahi jeera in a pan over low heat for 3-5 minutes. Let cool, then grind into a fine powder.
- Marinate the Chicken: In a bowl, coat chicken pieces with salt, turmeric, Kashmiri chili powder, lime juice, and half of the bhuna masala. Let it marinate for at least 30 minutes (or overnight for deeper flavor).
- Sear the Chicken: Heat oil in a heavy-bottomed pan and sear the marinated chicken on high heat for 3-4 minutes until lightly browned. Remove and set aside.
- Prepare the Curry Base: In the same pan, heat ghee, then add cumin seeds and dried red chilies. Sauté for 30 seconds until fragrant. Add chopped onions and cook for 7-8 minutes until golden brown.
- Build the Masala: Stir in ginger and garlic, sauté for 1 minute, then add tomato purée. Cook for 5-6 minutes until the oil starts to separate.
- Cook the Chicken: Return seared chicken to the pan, add the remaining bhuna masala and Kashmiri chili powder. Stir well and sauté for 3 minutes. Lower heat, add whisked yogurt, and mix continuously to prevent curdling.
- Simmer & Serve: Cover and let the curry simmer on low heat for 10 minutes. Garnish with fresh cilantro and julienned ginger. Serve hot with naan or basmati rice.


Notes
- For a richer flavor, let the chicken marinate overnight.
- To prevent yogurt from curdling, stir continuously and keep heat low.
- Spice levels can be adjusted by adding more or less Kashmiri red chili powder.
- For a dairy-free version, skip the yogurt or use coconut yogurt.
Nutrition
- Serving Size: 1 portion
- Calories: 320
- Sugar: 5g
- Sodium: 750mg
- Fat: 18g
- Saturated Fat: 6g
- Unsaturated Fat: 10g
- Trans Fat: 0g
- Carbohydrates: 12g
- Fiber: 3g
- Protein: 28g
- Cholesterol: 85mg