This post may contain affiliate links. For more information, see our Affiliate Disclosure Policy.
By Callie
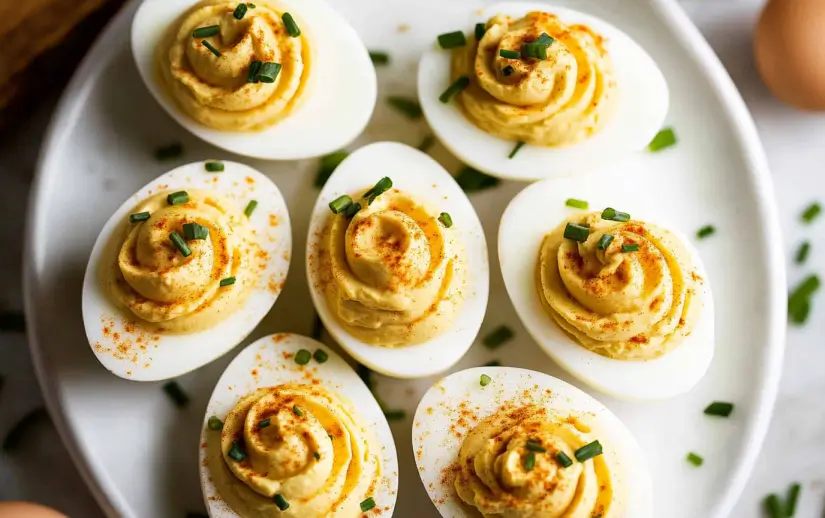
Deviled eggs are one of those appetizers that disappear at every gathering they appear at, regardless of what else is on the table. The combination of a perfectly hard-cooked egg white with the creamy, tangy, mustard-forward yolk filling is specifically the balance that makes them specifically more satisfying than their simplicity suggests. This classic deviled eggs recipe produces 12 halves from 6 eggs – the creamy yolk filling made from mashed egg yolks, full-fat mayonnaise, yellow or Dijon mustard, white vinegar, salt, and pepper – topped with smoked paprika. The recipe is the classic. Nothing experimental, nothing unexpected. It’s classic because it works, and it works because every ingredient is doing something specific in the filling’s balance.
The two technique elements worth understanding before starting: the 14-minute cook time and the ice bath. The 14-minute covered-off-heat cooking method produces a fully set yolk without the grey-green ring that surrounds an overcooked yolk – the grey ring is iron sulfide that forms when the egg is cooked too long or not cooled quickly enough after cooking. The ice bath immediately after cooking stops the cooking process and specifically makes the eggs easier to peel – the cold water causes the egg’s inner membrane to contract away from the shell, creating space that makes the shell lift away more cleanly than peeling a warm egg does. Both are specific techniques, not suggestions, and both produce meaningfully better results than skipping them.
Emily’s specific assessment of deviled eggs is that she eats the filling and leaves the white, which tells me she’s specifically there for the yolk mixture. My husband considers deviled eggs the single best return on investment in the appetizer category – “you make 6 eggs and suddenly there are 12 things to eat.” Which is specifically the correct math and specifically the reason deviled eggs appear at every gathering. For the egg-based appetizer companion that uses the same hard-cooked egg in a salad-sandwich format rather than a filled-half format, the Deviled Egg Salad takes the same yolk-and-mayo-and-mustard filling and converts it to a spreadable sandwich preparation.
Speed Hacks – Classic Deviled Eggs Ready In 35 Minutes:
- Boil the eggs up to 3 days ahead and store unpeeled in the refrigerator – unpeeled hard-cooked eggs keep perfectly and the day-of prep drops to 15 minutes of peeling, halving, and filling
- Use a zip-top bag as a piping bag – snip one corner off, fill the bag with the yolk mixture, and pipe; less setup than a formal piping bag, easier cleanup, and produces a neater result than spooning
- Press the yolks through a fine-mesh strainer rather than mashing with a fork – 30 seconds of pressing produces a smoother, creamier filling than 2-3 minutes of fork mashing; the strainer breaks down any remaining lumps that a fork misses
- Use older eggs (7-10 days from purchase) rather than very fresh eggs – fresh eggs have a thicker membrane that bonds more strongly to the shell; older eggs peel significantly more easily due to a small pocket of air that develops between the membrane and the shell
- Chill the filled deviled eggs for at least 30 minutes before serving – this firms the filling slightly and allows the flavors to develop; the 30-minute refrigerator time means the eggs can be filled early and the serving can happen at will without rushing
Why You Will Love This Classic Deviled Eggs Recipe
- The 14-minute covered-off-heat cooking method produces a perfectly cooked yolk every time – fully set but not overcooked, no grey ring, not rubbery. Most deviled egg recipes specify a boiling time (10-12 minutes at a rolling boil). The problem with boiling is variability: a rolling boil at sea level is different from a rolling boil at altitude; stovetop power varies; egg size affects the timing. The bring-to-boil-then-cover-and-remove-from-heat method uses residual heat trapped under the lid to cook the egg gently from the inside out. The trapped heat produces a more consistent, gentler cook than sustained boiling. At 14 minutes: the yolk is fully cooked throughout (no soft center) but not overcooked (no grey ring). The grey-green iron sulfide ring that appears around an overcooked yolk forms when hydrogen sulfide from the egg white’s proteins reacts with iron from the yolk – it happens when the egg is cooked beyond the point of doneness and is accelerated by slow cooling. The ice bath immediately after cooking stops the cooking and prevents this reaction from progressing.
- The ice bath is the specific step that makes peeling dramatically easier and stops the grey-ring-forming reaction simultaneously. Two distinct functions. First: peeling – cold water causes thermal contraction of the egg’s inner membrane, creating a small gap between the membrane and the shell that allows the shell to lift away rather than tearing the white’s surface as it comes off. Warm eggs peel unevenly; cold eggs peel cleanly. Second: stopping the cooking – even after the pot is removed from heat and the eggs are removed from the water, the residual heat inside a warm egg continues cooking the yolk. The ice bath terminates this residual cooking within 1-2 minutes. Together: easier peeling, no grey ring, consistently cooked yolk.
- Full-fat mayonnaise produces the creamiest, most specifically satisfying filling – not light mayo, not Greek yogurt, not avocado. Mayonnaise is approximately 70-80% fat (primarily from egg yolks and oil) – this fat content is specifically what produces the creamy, smooth, slightly rich filling that coats the egg white. Low-fat mayo has more water and less fat, producing a thinner filling that can become runny at room temperature. Greek yogurt produces a tangier, less specifically rich filling that is good on its own terms but produces a different, lighter result. Full-fat mayo is the ingredient that produces the classic deviled egg filling that people specifically recognize and specifically reach for at parties.
- The combination of mustard AND white vinegar provides two different types of acidity that produce a more complex filling than either alone. Mustard contributes acidity from the vinegar used in its production, but also contributes the specific sharp, slightly bitter, aromatic character of mustard’s volatile compounds (isothiocyanates). White vinegar contributes clean, pure acidity without additional flavor complexity. Together: the mustard’s complexity plus the vinegar’s clean brightness produce a filling that is specifically tangy and complex rather than just sour. The two-acid approach is the specific technique that distinguishes a filling that tastes considered from one that just tastes like mayonnaise with eggs.
- Smoked paprika on top is both a visual signal and a flavor contribution – specifically smoked, not sweet. The orange-red paprika on a white egg surface is the classic visual that signals “deviled eggs” immediately. Plain sweet paprika provides color but its flavor is mild enough at garnish quantities to be nearly undetectable. Smoked paprika provides color plus a specifically smoky, slightly warm character that is detectable as a garnish and specifically complements the creamy, tangy filling. The smoke note at the top of each egg ties the paprika’s contribution to the bacon in the bacon-deviled-egg variation and to the general savory richness of the filling.
Classic Deviled Eggs Ingredients
Deviled Eggs (Makes 12 Halves From 6 Eggs)
- 6 large eggs (older eggs peel more easily; use eggs that are 7-10 days from purchase if possible)
- 1/4 cup (60g) full-fat mayonnaise
- 1 teaspoon yellow or Dijon mustard (Dijon produces a more complex, slightly more sophisticated filling; yellow produces the most classic, most recognizably American deviled egg flavor)
- 1 teaspoon white vinegar (or apple cider vinegar for a slightly fruitier note)
- 1/8 teaspoon fine salt
- 1/8 teaspoon freshly ground black pepper
- 1/8 teaspoon red pepper powder (optional, for mild heat)
- Smoked paprika, for garnish
- Optional garnishes: finely chopped fresh chives, dill fronds, or flat-leaf parsley
Ingredient Notes And Substitutions
Yellow vs Dijon mustard: Yellow mustard produces the most classic, most specifically American-style deviled egg filling – the specific tang and bright color that most people associate with deviled eggs growing up. Dijon mustard (which is more finely ground and uses white wine rather than vinegar as the liquid) produces a more complex, slightly more sophisticated flavor with a slightly sharper, more specifically mustard character. Both are excellent; the choice comes down to whether you want the classic familiar version or the slightly more complex version. For a party where the goal is universal recognition: yellow mustard. For a dinner party where you want to signal care and intention: Dijon.
Why older eggs for this application: Fresh eggs (1-3 days from the hen, or very recently purchased) have a high pH inner membrane that adheres very strongly to the albumen (white). When peeling, the membrane often tears along with the white’s surface, producing ragged, pockmarked whites that look uneven and unappetizing. Eggs that are 7-10 days old have a slightly more alkaline white (CO2 has been released through the shell, raising the pH) and a membrane that has slightly separated from the white – they peel significantly more cleanly. The paradox: buy eggs for deviled eggs slightly before the occasion, allow 3-4 days on the counter or in the refrigerator, then cook. Or: use the steam method (place eggs in a steamer basket over boiling water for 14 minutes) which also produces easier-peeling fresh eggs by a slightly different mechanism.
Fine-mesh strainer for the yolks vs fork: A fork mashes yolks to a relatively fine crumble but leaves small lumps that don’t fully integrate into the mayonnaise – you can feel these as slightly grainy spots in the finished filling. Pressing the cooked yolks through a fine-mesh strainer forces them through small holes and produces a completely uniform, absolutely smooth powder that incorporates evenly with the mayonnaise for the creamiest, smoothest filling possible. The strainer method is the professional approach; it takes 30 seconds and produces a noticeably superior result.
Callie’s Kitchen Note: Emily eating the filling and leaving the white is specifically the eating pattern that tells me she’s processing deviled eggs as two separate foods rather than one. She’s not wrong: the white and the yolk filling are genuinely distinct components – the white is mild, firm, slightly rubbery, and neutral; the filling is creamy, tangy, rich, and specifically flavored. She’s choosing the better component and leaving the vehicle. My husband eats both together in each bite, which produces the balance the dish is designed for. Both approaches result in satisfied people, which is specifically the goal of a deviled egg at a party – no wrong way to eat them.

How To Make Classic Deviled Eggs
1- The Perfect Hard-Cooked Egg
Place the 6 eggs in a medium saucepan. Cover with cold water by approximately 1 inch. Place over high heat and bring to a full, rolling boil. When the water reaches a full boil: immediately remove the pan from the heat, cover with a lid, and allow the eggs to sit in the hot water for exactly 14 minutes. Do not return to heat during this time. The residual heat trapped under the lid gently finishes cooking the egg from the outside in.
Set up an ice bath while the eggs sit: fill a large bowl with cold water and a generous amount of ice (the colder the better – a bath that is just cool rather than genuinely cold produces slower cooling and less effective membrane contraction for peeling). At the 14-minute mark: use a slotted spoon to transfer the eggs from the hot water directly into the ice bath. Allow to sit in the ice bath for at least 5 minutes, ideally 10.
Why 14 Minutes Is The Specific Number
The 14-minute timing in the covered-off-heat method is calibrated for large eggs (approximately 2 oz / 56g each) at standard altitude (sea level to approximately 2,000 feet). this timing: the yolk is fully cooked throughout with no soft or liquid center, the white is fully set but not rubbery from overcooking, and the grey-green iron sulfide ring has not had time to form. At 12 minutes: the very center of the yolk may still be slightly soft or darker. 16 minutes: the grey ring begins to appear. 14 minutes is the specific window for a large egg in this method. For extra-large or jumbo eggs: increase to 15-16 minutes. For medium eggs: reduce to 12-13 minutes.
2- Peel, Halve, And Prepare The Filling
After the ice bath: peel the eggs under a thin trickle of cold running water. The water helps slide between the shell and the membrane during peeling. Start at the wider end of the egg (where there’s usually a small air pocket that creates a natural starting point) and peel in sections, using your thumb to slide between the shell and the white. With older eggs and a proper ice bath: the shell should come off in large sections with minimal white surface damage.
Slice each peeled egg in half lengthwise with a sharp, thin-bladed knife. A sharp knife cutting with a single smooth motion produces clean egg white halves with an even internal surface. A dull knife sawing through the egg tears the surface. Place the 12 egg white halves on a plate or deviled egg serving tray. Remove the yolks and place in a fine-mesh strainer set over a medium bowl.
Press the yolks through the strainer using a spatula or the back of a spoon – push the yolks against the mesh in circular motions until all the yolk has passed through the strainer as a fine, smooth powder in the bowl below. Add the mayonnaise, mustard, white vinegar, salt, black pepper, and optional red pepper powder to the yolk powder. Stir with a fork until completely smooth, uniform, and creamy. Taste and adjust: more salt if it needs it, more vinegar if it needs more brightness, more mustard if it needs more sharpness.
Callie’s Kitchen Note: The ice bath is the step that separates a stressful, pockmarked deviled egg experience from a smooth one. I made deviled eggs without an ice bath for years – I’d let the eggs cool on the counter until they were cool enough to handle, then peel them warm. The whites tore constantly, the grey ring appeared despite my best efforts, and the peeling took twice as long and produced worse results. The first time I used a properly cold ice bath (genuinely cold, with a cup of ice in a bowl of cold water, not just room-temperature water): the eggs peeled in large clean sections, the whites had intact smooth surfaces, and no grey ring. It’s 30 seconds of setup – filling a bowl with ice and water while the eggs cook – that produces a fundamentally different result. I now never make hard-cooked eggs without it.
3- Fill And Garnish
Transfer the filling to a zip-top bag or piping bag. If using a zip-top bag: press the filling into one corner of the bag, then snip off approximately 1/2 inch of the corner to create an opening. Pipe the filling into each egg white half, filling generously to a slightly rounded mound above the white’s surface – deviled eggs that are under-filled look sparse and unappetizing; a full, slightly mounded fill looks specifically good and provides a better white-to-filling ratio per bite.
Garnish each filled half with a light dusting of smoked paprika (a pinch between the fingers, scattered across the top) and any optional fresh herb garnishes – a small frond of dill, a tiny snip of chive, or a small parsley leaf pressed into the filling. The garnish takes 60 seconds for all 12 halves and is specifically worth doing – the green-against-orange-against-white color contrast is the visual that makes a plate of deviled eggs look specifically finished rather than just filled.
Refrigerate for at least 30 minutes before serving. The 30-minute chill firms the filling slightly (it becomes slightly less soft and more pipeable) and allows the mustard, vinegar, and salt to fully integrate with the yolk and mayonnaise for a more developed, more cohesive flavor. Deviled eggs served immediately after filling taste good; deviled eggs served after 30 minutes of chilling taste specifically better.
Callie’s Kitchen Note: My husband’s “you make 6 eggs and suddenly there are 12 things to eat” observation is the exact math that makes deviled eggs specifically efficient for appetizer planning. A plate of 24 halves from 12 eggs serves 8-10 people as an appetizer, costs approximately $3-4 in eggs and fillings, and takes 35 minutes total. The return per dollar and per minute of effort is specifically better than almost anything else in the appetizer category. The other quality: they require no serving utensils beyond the plate they’re presented on. Each one is a self-contained portion that can be picked up and eaten in one or two bites. No forks, no knives, no dipping, no spreading. This is the appetizer that requires the least infrastructure from the host and produces the best reaction from guests. Every time.
Common Mistakes To Avoid
Skipping The Ice Bath
The most consequential shortcut omission: warm eggs peel unevenly (torn whites, pockmarked surfaces) and the yolk’s grey ring continues developing without the rapid cooling stop. The ice bath takes 30 seconds to set up and 5-10 minutes of passive time. Both of its benefits – easier peeling and no grey ring – are specifically achieved by nothing else. Do not skip it.
Overcooking
Every minute beyond 14 minutes increases the grey ring’s severity. Set a timer. The 14-minute off-heat method is already forgiving compared to boiling (a few extra minutes of boiling is more damaging than a few extra minutes of off-heat), but cooking significantly past 14 minutes will produce a grey ring regardless. If you notice the ring: the eggs are still edible and the filling will still taste good, but the presentation is compromised.
Using Too Much Mayonnaise
The 1/4 cup for 6 eggs (6 yolks) is the calibrated quantity. More mayo produces a looser, potentially runny filling that doesn’t hold its piped shape and tastes primarily of mayo rather than egg. Start with the specified quantity, mix, and add more only if the filling seems too thick to pipe. The correctly proportioned filling should hold a soft peak when lifted with a spoon – thick enough to pipe cleanly, soft enough to be creamy when eaten.
Not Seasoning Enough
The 1/8 teaspoon each of salt and pepper is a minimum – taste after mixing and add more of each if the filling tastes flat or muted. Hard-cooked egg yolk is mild; without adequate salt and acid (mustard + vinegar) the filling has no brightness. The correctly seasoned filling should taste specifically tangy and savory. Taste before piping, every time.
Peeling Too Soon
Peeling warm eggs before the ice bath is fully cooled – within 2-3 minutes of the ice bath – produces worse results than waiting the full 5-10 minutes. The thermal contraction of the membrane from the cold bath is what makes peeling easier; that contraction takes time. Wait the full time.
Callie’s Kitchen Note: The fine-mesh strainer for the yolks is specifically the technique upgrade that made the biggest visible quality difference in my deviled egg results. Before using the strainer: I mashed with a fork until I thought the yolks were smooth, mixed in the mayo, and there were always a few small lumps detectable when eating. After using the strainer: the filling is completely, uniformly smooth – no lumps, silky consistency, evenly colored. The strainer takes 30 seconds of pressing vs 2-3 minutes of fork mashing, and produces a specifically better result in less time. I now only use the fork to stir in the mayo and seasonings after the strainer has done the yolk work.
Storage And Make-Ahead Notes
Assembled deviled eggs: Store covered (use plastic wrap pressed gently against the filling surface to prevent a skin forming) or in a deviled egg carrier in the refrigerator for up to 2 days. The filling softens slightly over time as the moisture from the white migrates into the filling; assembled eggs are best consumed within 24 hours for the best texture.
Components separately (best make-ahead method): Store the hard-cooked egg whites in cold water in a sealed container for up to 2 days. Store the yolk filling in a zip-top bag (air pressed out) in the refrigerator for up to 2 days. Pipe just before serving. This approach produces fresher results than pre-assembled storage.
Unpeeled hard-cooked eggs: Store in the refrigerator for up to 1 week. This is the most practical make-ahead approach for a busy hosting situation – boil on Monday for a party on Thursday; peel, fill, and garnish 30-60 minutes before the gathering.
Classic Deviled Egg Variations
Bacon And Chive Deviled Eggs
Cook 3-4 strips of bacon until crispy. Crumble finely. Add half the crumbled bacon into the yolk filling along with the other ingredients. Use the remaining bacon crumbles as the primary garnish on top of each filled egg, alongside finely snipped fresh chives. Replace the smoked paprika with a pinch of black pepper garnish. The bacon-and-chive version is the one that consistently disappears first at any gathering where multiple deviled egg varieties are offered – the bacon’s salt and smoke and the chive’s fresh bite produce a filling that is specifically more interesting than the plain version without being dramatically different. This is the variation to make when you want to go slightly beyond classic without going anywhere unexpected.
Spicy Sriracha Deviled Eggs
Add 1 teaspoon of sriracha to the yolk filling. Increase the red pepper powder to 1/4 teaspoon. Garnish with a small drop of sriracha on top of each filled egg alongside the smoked paprika. The sriracha version has a specific, recognizable chili-garlic heat that builds gradually with each bite. Reduce or omit the mustard if the sriracha’s acidity provides sufficient brightness. For the garnish: a single small drop of sriracha centered on top of the smoked paprika provides a visual signal of the heat level inside. These are the deviled eggs to label at a party so guests can choose.
Avocado Deviled Eggs
Replace 2 tablespoons of the mayonnaise with 2 tablespoons of mashed ripe avocado (very smooth – press through the strainer with the yolks for the smoothest result). Add 1 teaspoon of fresh lime juice in place of the white vinegar. Add a pinch of cumin to the filling. Garnish with a very thin slice of avocado and a few cilantro leaves. The avocado version is creamier, greener in color, and has a distinctly different flavor profile from the classic – more specifically guacamole-adjacent than deviled egg. The lime-avocado combination produces a bright, fresh filling that is particularly good in summer. Serve these immediately after assembly – avocado browns quickly at exposed surfaces even with lime juice.
Dill Pickle Deviled Eggs
Add 2 tablespoons of very finely minced dill pickle to the yolk filling (pat dry with paper towels to remove excess moisture before mincing – watery pickles make the filling runny). Replace the white vinegar with 1 teaspoon of pickle brine. Add an extra 1/2 teaspoon of mustard. Garnish each filled egg with a thin slice of dill pickle standing upright in the filling. The dill pickle version is the one for people who love the briny, tangy, specifically pickled character that some deviled egg versions gesture toward but rarely commit to. The brine as the acid source produces the most specifically dill-pickle-flavored deviled egg available.
Serving Suggestions
Party Or Gathering
Arrange the filled deviled eggs on a white or neutral platter with the filling-side up, positioned so each half is slightly tilted toward the viewer rather than lying completely flat – this shows the filling mound more effectively. If using a standard oval plate: arrange in concentric oval rings. If using a round plate: arrange in a spiral from the outside in. The arrangement takes 2 minutes and produces a significantly more intentional-looking presentation. Scatter a few fresh herb leaves (chives, dill, flat-leaf parsley) across the platter for color. Refrigerate until 10 minutes before serving – remove from the refrigerator slightly ahead to take the chill off without the filling becoming too soft.
Easter Or A Holiday Brunch
Deviled eggs are specifically associated with Easter in American cooking – the hard-boiling and decorating of eggs is an Easter tradition, and deviled eggs use those same boiled eggs in their most classically delicious format. A platter of deviled eggs at Easter brunch or a spring gathering is culturally appropriate, visually appealing, and practically effortless alongside the larger dishes that require actual cooking. They work as a stand-alone appetizer, as a brunch component, or as a side dish alongside a larger protein.

Classic Deviled Eggs FAQ
The grey-green ring around the yolk is iron sulfide – it forms when the sulfur compounds in the egg white’s proteins react with the iron in the yolk at high temperatures over extended time. Three causes: boiling too long, cooking at too high a sustained temperature, or cooling too slowly after cooking. Prevention: the 14-minute covered-off-heat method produces a gentler cook than sustained boiling; the ice bath stops the cooking and prevents the slow-cooling that allows the iron sulfide reaction to progress. If the ring is already present: the eggs are still completely safe and taste fine; the visual is the only compromise.
The zip-top bag method: press all the filling into one corner of a zip-top bag, press out excess air, seal, and snip approximately 1/2 inch off the corner. This creates a functional piping bag that produces a clean, rounded mound of filling. For a decorative star tip: snip a slightly smaller opening (about 1/4 inch) – the smaller opening produces more pressure and a more defined fill shape. Alternatively: a small spoon or a cookie scoop produces a rounded mound that looks deliberately placed rather than hastily spooned. The spoon method is specifically faster for a large batch (24+ halves) where the zip-top bag requires refilling.
Scale directly: 12 eggs produce 24 halves, 18 eggs produce 36, and so on. The filling recipe scales linearly (double the eggs, double all filling ingredients). The primary limitation is the pot size for boiling – cook in multiple batches if your pot can’t accommodate all the eggs in a single layer. For very large batches (20+ eggs): boil in two separate batches rather than one large pot where the water temperature recovery after adding cold eggs is too slow and produces uneven cooking. Allow 30+ minutes of refrigerator time for large batches before serving to ensure the filling is properly chilled throughout.
Almost always: eggs that are too fresh (very fresh eggs have a membrane that adheres strongly to the white) or eggs that were not cooled in an ice bath. For immediately better results with fresh eggs: steam them (steamer basket over boiling water, covered, 14 minutes) instead of boiling – the steam penetrates differently than water and produces easier-peeling eggs even when fresh. For the longer-term solution: buy eggs 5-7 days before you plan to make deviled eggs and allow time for the natural membrane separation that happens during refrigerator storage.
Recipes You May Like
If this classic deviled eggs recipe has you building a collection of crowd-pleasing, make-ahead appetizers and brunch additions that deliver maximum return for minimal effort, here are three more from the blog in the same spirit.
Deviled Egg Salad – The sandwich-format companion that takes the exact same yolk-mayo-mustard-vinegar filling and converts it into a spreadable salad for toast, sandwiches, or lettuce wraps. Where the deviled eggs are the elegant, platter-arranged appetizer format, the deviled egg salad is the casual, spreadable, make-ahead lunch format using the same flavor combination. Both start with hard-cooked eggs and the same filling components; the preparation and the serving context are completely different.
Healthy Breakfast Egg Muffins – The baked egg companion for meal prep occasions where hard-cooked eggs should give way to a savory, customizable baked egg format that reheats well throughout the week. Where deviled eggs are the appetizer and entertaining format, the breakfast egg muffins are the weekday meal prep format. Both are egg-forward, protein-rich, and quick to make; the preparation method and the serving context are completely different.
Fully Loaded Bagel Bar – The brunch spread companion for the occasion when deviled eggs should be part of a larger, interactive brunch format rather than a standalone appetizer. Where deviled eggs are the self-contained, pick-up-and-eat appetizer portion, the bagel bar is the build-your-own interactive brunch spread. Both are appropriate for gatherings where guests are present and the food should feel specifically abundant and specifically welcoming. Together they produce a complete brunch table with minimal from-scratch cooking.
Conclusion
These classic deviled eggs disappear at every gathering they appear at. Six eggs, 12 halves, 35 minutes, two technique steps that matter: the 14-minute covered-off-heat cook and the ice bath. The ice bath makes them peel easily. The 14-minute timing prevents the grey ring. The fine-mesh strainer makes the filling smooth. The 30-minute refrigerator rest makes the filling taste better. These four things produce the deviled egg that Emily eats the filling from and my husband considers the best return on investment in the appetizer category.
Set up the ice bath while the eggs cook. It takes 30 seconds. It changes the result completely. That is specifically the whole technique in one sentence.
Tell me in the comments whether you tried the bacon and chive version or the dill pickle variation, and whether the deviled eggs made it to the serving platter before anyone helped themselves. Save this to Pinterest for your next Easter brunch, potluck, barbecue, or any gathering that calls for the appetizer that disappears first every single time – and happy cooking!
Happy cooking! – Callie


Classic Deviled Eggs Recipe

Classic deviled eggs are a creamy, tangy, and perfectly seasoned appetizer, ideal for brunch, potlucks, barbecues, or Easter gatherings. Made with just a handful of ingredients, they’re quick, easy, and packed with flavor. Whether you prefer them mild or with a spicy kick, these deviled eggs are a guaranteed crowd-pleaser.
- Prep Time: 15 minutes
- Cook Time: 20 minutes
- Total Time: 35 minutes
- Yield: 12 deviled eggs 1x
- Category: Appetizer
- Method: Stovetop
- Cuisine: American
- Diet: Vegetarian
Ingredients
- 6 large eggs
- ¼ cup mayonnaise
- 1 teaspoon mustard
- 1 teaspoon white vinegar
- ⅛ teaspoon salt
- ⅛ teaspoon black ground pepper
- ⅛ teaspoon red pepper powder (optional for spice)
- Smoked paprika (optional, for garnish)
- Finely chopped herbs like chives, dill, or parsley (optional, for garnish)
Instructions
- Boil the Eggs: Place eggs in a medium saucepan and cover with water so that there is about an inch of water above the eggs. Bring to a boil over high heat, then remove from heat, cover, and let sit for 14 minutes.
- Cool & Peel: Transfer eggs to an ice water bath or run them under cold water for a minute to stop the cooking process. Carefully peel the eggs.
- Prepare the Filling: Slice each egg in half lengthwise and remove the yolks. Place yolks in a bowl and set egg whites aside. Mash yolks with a fork until crumbly.
- Mix Ingredients: Add mayonnaise, mustard, vinegar, salt, and black pepper to the mashed yolks. If you like heat, add red pepper powder. Stir until smooth and creamy.
- Fill the Eggs: Spoon the yolk mixture into a piping bag fitted with a star tip and pipe into the egg whites. If you don’t have a piping bag, simply use a spoon to fill them.
- Garnish & Serve: Sprinkle with smoked paprika and chopped herbs. Serve immediately or refrigerate until ready to serve.


Notes
- Make-Ahead Option: Store the yolk mixture in a piping bag or airtight container in the fridge and assemble just before serving.
- No Piping Bag? Use a zip-top bag with the corner cut off for an easy alternative
- Storage: Keep deviled eggs in an airtight container in the fridge for up to 2-4 days.
Nutrition
- Serving Size: 1 deviled egg
- Calories: 80
- Sugar: 0.3g
- Sodium: 95mg
- Fat: 6g
- Saturated Fat: 1.5g
- Unsaturated Fat: 4g
- Trans Fat: 0g
- Carbohydrates: 0.5g
- Fiber: 0g
- Protein: 3.5g
- Cholesterol: 95mg