This post may contain affiliate links. For more information, see our Affiliate Disclosure Policy.
By Callie
Hash browns are specifically simple food – grated potatoes cooked in oil until crispy. The simplicity is specifically where the difficulty hides. Most homemade hash browns are either pale and soft (not enough moisture removed, pan not hot enough), dense and gummy (wrong potato type, too much starch added), or golden on the outside but raw in the center (heat too high, no covered phase to cook the interior). The gap between a diner hash brown and most homemade attempts is entirely about technique, not ingredient complexity. These homemade hash browns address each of the three failure modes through three specific technique elements: aggressive moisture removal (the single most impactful step), cornstarch added to the dried grated potato (which absorbs remaining surface moisture and promotes crisping), and the covered-then-uncovered cooking sequence (which cooks the interior in the covered phase and crisps the exterior in the uncovered phase).
The moisture removal step is where most hash brown recipes are insufficiently specific. “Squeeze out excess moisture” is the typical instruction. The reality: a medium russet potato contains approximately 79% water by weight. After grating, the shreds release that water readily, and a typical hand-squeeze removes only 30-40% of the available moisture. The technique that removes significantly more: wring the grated potato in a clean kitchen towel with serious force, then pat the shreds dry with paper towels. Between the two steps, approximately 60-70% of the potato’s moisture is removed before it hits the pan. The difference in the finished hash brown is specifically the difference between crispy and pale-soft.
My husband has made hash browns dozens of times over the years with varying results, and specifically described the problem himself when I first made the technique-focused version: “why do mine always come out soft?” The answer: he was skipping the full moisture removal (hand squeeze into the sink, move on) and not using the covered phase to finish the interior. Emily eats hash browns without question or comment, which means they’ve always been good enough – but after tasting this version with the full technique, she said “these are crunchier than the ones we usually have,” which is specifically what the technique is designed to produce. For the same-skillet potato companion in a cube format rather than shredded, the Southern Fried Potatoes applies the same covered-then-uncovered cooking sequence to cubed russets for a different but equally satisfying result.
Speed Hacks – Crispy Hash Browns On The Table In 25 Minutes:
- Grate the potatoes the night before – store shredded potatoes submerged in cold water in the refrigerator overnight (this actually draws additional starch from the potato into the water, which is then discarded, producing an even crispier result); drain and moisture-remove in the morning
- Use a food processor with the shredding disc rather than a box grater – 30 seconds of processing vs 3-4 minutes of grating for two potatoes; the food processor‘s shred is slightly less uniform than a box grater but produces equivalent results
- A salad spinner is the most efficient first moisture-removal step – place the grated potato in the spinner basket, spin vigorously for 30 seconds, and the centrifugal force removes more moisture than hand-squeezing; follow with the kitchen-towel-wring for maximum removal
- Pre-mix the cornstarch and seasonings in a small bowl before starting – having them ready means the dried potato shreds go straight from the drying step to the bowl without any delay (delay = more moisture releases from the shreds back to the surface)
- Use a cast-iron or carbon-steel skillet – these retain heat when the cold potato shreds are added, recovering the searing temperature faster than non-stick or thin stainless pans; faster heat recovery = less steaming, more searing
Why You Will Love These Homemade Hash Browns
- Russet potatoes are the only correct potato for hash browns – not Yukon Gold, not red, not fingerling. Russet potatoes have two specific qualities that make them the right choice. First: high starch content (18-20% starch by weight vs 12-14% for Yukon Gold, 8-10% for red potatoes). The starch acts as a natural binder when the grated shreds are pressed into a patty – the starch granules on the cut surfaces create adhesion that holds the shreds together during cooking without requiring added binders beyond a small amount of cornstarch. Second: lower moisture content than waxy potatoes. Less moisture means less steam to overcome during the crisping phase and a faster, more complete browning. Waxy potatoes (red, fingerling, some Yukon Gold varieties) hold their structure and moisture during cooking – good qualities for roasted potatoes, specifically wrong for hash browns where the goal is the opposite: maximum starch release and maximum moisture removal.
- The cornstarch serves two simultaneous functions: absorbing residual surface moisture from the dried shreds and creating a thin, starchy coating that promotes the specific golden, crispy exterior of a well-made hash brown. Even after thorough moisture removal, the grated potato shreds have a slightly moist surface from the cell fluid released during grating. Cornstarch mixed through the dried shreds absorbs this residual moisture immediately. In the hot pan, this cornstarch layer undergoes the same starch-gelatinization-then-crisping that makes fried foods specifically crispy: the starch absorbs heat, gelatinizes, and then dehydrates into the thin, brittle, specifically crunchy layer that is the hash brown’s exterior texture. Flour (the alternative) produces the same effect but with a slightly heavier, slightly less crispy result than the lighter cornstarch.
- The covered-then-uncovered cooking sequence produces the specific diner hash brown quality: cooked-through interior AND crispy exterior. A hash brown cooked entirely uncovered must be cooked at a temperature that simultaneously browns the exterior and conducts enough heat to the interior to fully cook the potato – but the exterior reaches browning temperature faster than the interior reaches cook-through temperature, producing a burned exterior with an undercooked center. The covered phase traps steam from the potato’s own remaining moisture, creating a moist-heat environment that cooks the interior from within while the contact surface continues to brown. The uncovered phase then drives off the steam and allows the exterior (top surface, now exposed) to crisp from the dry heat. Together: cooked interior, crispy on both sides.
- Medium heat (rather than high heat) is the counterintuitive correct choice for the initial cooking phase of a hash brown. High heat produces rapid exterior browning before the starch in the interior has had time to fully cook through – the result is a brown exterior and a white, still-starchy interior. Medium heat allows the starch granules throughout the patty to slowly heat through, absorb moisture, and cook to the tender, slightly fluffy interior that characterizes a great hash brown, while the contact surface develops golden color at a pace that matches the interior’s cooking time. The covered phase with steam also contributes moist heat that further helps the interior cook through.
- Not flipping too early is specifically the instruction most often violated – and flipping too early destroys the hash brown’s crust before it has set. After the hash brown is placed in the pan: it immediately begins releasing moisture from its surfaces. This moisture must evaporate before the Maillard browning of the potato’s starch and sugars can begin. For approximately 2-3 minutes, the hash brown looks like it’s not doing anything. This is the moisture-evaporation phase. After 2-3 minutes, the browning begins and proceeds relatively quickly. By the 5-minute mark: a properly cooked hash brown has a golden-brown, set crust that releases cleanly from the pan. A hash brown flipped at 2 minutes has a fragile, partially set, pale crust that tears and sticks when the spatula is applied. “5 minutes undisturbed” is the specific instruction that produces the crust that makes flipping clean and effective.
Homemade Hash Browns Ingredients
For The Hash Browns (Serves 2-3)
- 2 medium russet potatoes (about 1.5 lbs / 680g total), peeled
- 2 tablespoons cornstarch (or all-purpose flour as a substitute)
- 1/2 teaspoon garlic powder
- 1/4 teaspoon onion powder
- 1/2 teaspoon fine salt
- 1/4 teaspoon freshly ground black pepper
- 2 tablespoons vegetable oil, canola oil, or clarified butter (clarified butter produces the richest flavor and the highest smoke point)
Optional Additions
- 1/4 teaspoon smoked paprika (adds depth without heat)
- Pinch of cayenne pepper (for mild background heat)
- 1 tablespoon finely grated yellow onion incorporated into the potato shreds (adds sweetness and additional browning compounds)
- 2 tablespoons shredded cheddar cheese mixed in before cooking (produces a cheesy, golden exterior crust)
Ingredient Notes
Clarified butter vs vegetable oil for hash browns: Vegetable oil (neutral flavor, high smoke point – approximately 400-450 degrees F) is the standard choice and produces a clean, potato-forward hash brown. Clarified butter (butter with milk solids removed, smoke point approximately 450 degrees F) produces a specifically richer, more specifically buttery flavor without the risk of burning that unclarified butter carries at the sustained medium heat hash browns require. Regular unclarified butter (smoke point approximately 300-350 degrees F) burns before reaching the optimal hash brown cooking temperature and produces a bitter note. If you want butter flavor in your hash browns: clarified butter is the correct form. If you don’t have clarified butter: vegetable or canola oil is the reliable standard.
Why peeling is important for this preparation: Unlike the Southern fried potatoes (where russet skin crisps into a textural element on the cube’s surface), hash brown shreds with skin produce a slightly tough, papery element at the skin-side of each shred that disrupts the uniformly crispy, tender interior texture of a well-made hash brown. The skin’s tough cell structure also inhibits the starch release that produces the natural binder effect. Peel the potatoes for hash browns. The skin contributes nothing good to the shredded format.
Callie’s Kitchen Note: My husband’s “why do mine always come out soft?” question was the specific diagnostic question that explained the whole problem. His technique: grate the potato, squeeze with his hands over the sink until the water stops dripping, season, put in the pan. No cornstarch. No covered phase. No full moisture removal. The result is predictable: the residual moisture in the shreds converts to steam when it hits the hot oil, preventing the Maillard browning that requires a dry surface, and the interior never gets the moist-heat cooking it needs from the covered phase. After watching the full technique once, he identified immediately what he’d been missing: “you actually have to get all the water out.” Specifically yes. That is the entire technique in five words.

How To Make Crispy Homemade Hash Browns
1- Grate And Remove The Moisture (The Critical Phase)
Peel the russet potatoes. Using the largest holes of a box grater (or a food processor with the shredding disc), grate the potatoes into long, consistent shreds. Work quickly – grated raw potato oxidizes and turns pinkish-brown when exposed to air. The browning is cosmetic (it doesn’t affect flavor or texture) but if the appearance matters: work as quickly as possible and proceed immediately to the moisture removal phase.
Place the grated potato shreds in a clean kitchen towel. Gather the corners of the towel and twist tightly, pressing the shreds against the center of the twisted bundle. Wring firmly – the goal is to remove as much moisture as possible. The water expelled from the potato will be noticeably milky-white from the starch. Wring, re-position, and wring again. Continue until very little additional liquid comes out. Open the towel and spread the shreds on paper towels. Pat dry with additional paper towels. The shreds should feel dry to the touch, slightly compressed, and a lighter tan color than the raw white of freshly grated potato.
Why You Must Remove More Moisture Than Feels Necessary
A medium russet potato is approximately 79% water. After peeling and grating, the shreds have approximately 75-77% water content – still very high. Each gram of remaining water that reaches the pan converts to steam in the hot oil, and steam prevents Maillard browning (which requires temperatures above 280 degrees F / 140 degrees C – steam keeps the surface temperature below 212 degrees F / 100 degrees C until all the water has evaporated). A potato shred with 75% water content will steam for a long time before it begins to brown. A potato shred with 50-55% water content (after aggressive drying) begins browning significantly sooner. The specific color and texture difference between hash browns made with adequately-squeezed potato and properly-dried potato is visible and significant. The 30-second hand squeeze is not sufficient. The kitchen towel wring plus paper towel pat is the minimum.
2- Season With Cornstarch And Spices
Transfer the dried grated potato shreds to a large bowl. Add the cornstarch, garlic powder, onion powder, salt, and black pepper. Toss thoroughly with your hands until the cornstarch and seasonings are evenly distributed through all the shreds. The mixture should feel slightly dusty and dry – the cornstarch coating the shreds is specifically what you want to feel. Work quickly and proceed to cooking immediately – the shreds will begin releasing moisture again as the cornstarch absorbs what it can, but more moisture continues coming from the potato’s cells.
3- Cook The Hash Browns
Heat a large skillet (10-12 inch; cast-iron preferred) over medium heat. Add the vegetable oil or clarified butter. Allow the oil to heat until it shimmers – approximately 1-2 minutes. A drop of water should sizzle and evaporate immediately when added to the hot oil.
Take a generous handful (approximately 1/3 of the potato mixture) and form it into a loose ball, then gently press it flat onto the cooking surface to create a patty approximately 1/4 to 1/3 inch thick. Press firmly enough for the patty to hold together but not so firmly that it becomes dense and compact. Repeat with the remaining mixture to create 2-3 patties. If they don’t all fit without crowding: cook in batches. Crowded hash browns steam each other and can’t develop the crust.
Cover the skillet with a lid. Cook covered over medium heat for 5 minutes without disturbing. The covered phase: traps steam (cooks the interior), allows the moisture-evaporation phase to happen under the lid (where the steam can escape around the lid’s edges rather than pooling in the pan), and allows the contact surface to develop its initial golden crust. Do not lift the lid during this phase.
After 5 minutes: carefully slide a thin spatula under one hash brown to check the crust. It should be deep golden brown and release cleanly from the pan. If pale or sticking: replace the lid and cook 1-2 more minutes. When the bottom is golden: flip each hash brown in a single confident motion. Cook uncovered for 3-4 more minutes until the second side is also golden brown.
Callie’s Kitchen Note: Emily’s “these are crunchier than the ones we usually have” is specifically the comparison that confirms the technique is producing its intended result. She’s eating hash browns at diners occasionally and at home regularly, and she identified without prompting that something was specifically different – specifically better – about the version made with the full moisture-removal technique. The crunch she identified is specifically the cornstarch crust producing the brittle exterior that thorough moisture removal allows to form. When moisture is present, the exterior steams rather than crisps. When moisture is removed, the starch can dehydrate into the specific brittle crust. Her palate identified the result accurately without knowing anything about the technique producing it.
Common Mistakes To Avoid
Insufficient Moisture Removal
Already established as the most critical technique element. The hand-squeeze is not enough. Kitchen-towel wring plus paper-towel pat is the minimum. A salad spinner before the towel wring is even better. The moisture must come out before the pan or the hash browns will steam rather than crisp. This is the mistake my husband had been making for years; it’s the mistake that most people make for the same reason: “squeezing out the moisture” is specified but not the specific mechanism.
Flipping Too Early
Already addressed: the crust needs 5 full minutes to develop. Testing at 2-3 minutes produces a potato shred that tears and sticks. Wait the full 5 minutes. The visual cue that it’s time: a golden-brown visible edge at the patty’s bottom perimeter as seen from the pan’s side.
Using The Wrong Potato
Waxy potatoes (red, fingerling, new potatoes) don’t crisp in a hash brown application because their lower starch and higher moisture content prevents the starch-crust formation and produces persistent moisture that steams rather than crisps. Russet specifically. No substitutes produce the same result.
Overcrowding The Pan
Hash browns that are touching or overlapping steam each other rather than crisping individually. Each patty needs space around it. Two to three patties in a 12-inch skillet is the correct density.
Too High Heat
Already addressed: high heat burns the exterior before the interior cooks through. Medium is the correct temperature. The covered phase with steam partially compensates for any heat management issues, but medium is still specifically correct throughout both phases.
Callie’s Kitchen Note: The overnight-soak technique mentioned in the Speed Hacks is worth specifically understanding. Placing grated raw potato shreds in cold water in the refrigerator overnight draws starch from the potato surface into the water. When you drain the potato the next morning and remove the moisture, you’re discarding that starch-laden water. The resulting potato shreds have less surface starch than freshly grated – which sounds counterintuitive for crispiness (starch = crust), but the removed starch is specifically the amylose starch that contributes to gumminess and stickiness rather than crispiness. What remains after the soak is the amylopectin-rich starch that crisps more cleanly. The overnight-soaked version produces a hash brown with a crisper, less gummy exterior than the freshly-grated version. If you have a plan-ahead morning: this is the upgrade worth making.
Storage And Reheating
Cool completely before storing. Hot hash browns trap steam in a container and become soft immediately. Allow to cool at room temperature for at least 15 minutes before storing.
Refrigerator: In an airtight container for up to 5 days. The hash browns soften in the refrigerator as moisture from the air and from their own cells migrates to the surface. Reheating restores crispness.
Air fryer reheating (best for crispness): 400 degrees F for 5 minutes. The circulating hot dry air re-crisps the exterior very effectively. This is specifically the best reheating method for hash browns – the result is close to fresh-cooked quality.
Stovetop reheating: Medium-high heat in a dry skillet (no oil needed – there’s enough residual oil in the hash brown) for 2-3 minutes per side until re-crisped. Second best to air fryer.
Oven: 375 degrees F for 10 minutes on a baking sheet. Produces re-warmed hash browns with partial crispness recovery – not as effective as air fryer or stovetop.
Freezing: Arrange cooled hash browns on a baking sheet in a single layer, freeze until solid (1-2 hours), then transfer to a freezer bag for up to 3 months. Reheat directly from frozen in the air fryer (400 degrees F, 8-10 minutes) or oven (375 degrees F, 15-20 minutes). Do not microwave from frozen – the exterior will be soft and the interior potentially cold in the center.
Homemade Hash Brown Variations
Cheesy Hash Browns
After the cornstarch and seasonings are tossed through the dried potato shreds: add 3-4 tablespoons of finely shredded sharp cheddar cheese and toss to distribute. The cheese melts into the potato during cooking and produces a specifically golden, slightly bubbly, cheese-crisped exterior alongside the standard hash brown crust. The cheddar also provides additional binding that helps the patty hold together during flipping. This is the most popular variation – the combination of potato crust and melted cheddar is specifically the breakfast-restaurant hash brown that people try to replicate at home.
Herb Hash Browns
Add 1 tablespoon of finely chopped fresh rosemary (or thyme, or a combination) and 2 teaspoons of finely minced fresh garlic (in addition to the garlic powder already in the recipe) to the seasoning mixture before tossing with the dried potato shreds. The fresh herbs caramelize slightly against the hot pan surface and produce a specifically aromatic, more complex hash brown than the plain version. This is the dinner-side version – specifically appropriate alongside roasted chicken or a simple steak, not just as a breakfast component.
Loaded Hash Browns
After cooking and plating: top each hash brown with a dollop of sour cream, a small handful of crumbled crispy bacon, a few snips of fresh chives, and a sprinkle of shredded sharp cheddar. The loaded version is the baked-potato concept applied to a hash brown – specifically the approach for a dinner where the hash brown should be a more substantial, more specifically composed component rather than a simple side.
Southwest Hash Browns
Add 1/2 teaspoon of cumin, 1/4 teaspoon of chili powder, and 1/4 teaspoon of smoked paprika to the seasoning mixture. After cooking and plating: top with a drizzle of sriracha or Cholula, a spoonful of pico de gallo, and a few slices of avocado. The Southwest version is specifically good alongside scrambled eggs with jalapeños for the most specifically Tex-Mex-influenced breakfast plate available from a potato patty.
Serving Suggestions
The Complete Breakfast Plate
Hash brown, two fried eggs (over easy so the yolk provides a sauce when broken), two strips of crispy bacon or sausage links, toast. The hash brown’s crispy exterior and mild, starchy interior anchor the plate as the carbohydrate and provide the textural contrast that makes the other components more interesting. The broken egg yolk over the hash brown is specifically one of the most satisfying combinations available from a breakfast plate.
With Biscuits And Gravy
As in the Southern fried potatoes serving suggestion: hash browns alongside biscuits and gravy produces the full Southern breakfast spread. The hash brown’s crispiness against the biscuit’s softness and the gravy’s creaminess produces specific textural contrast that makes the combination more interesting than any individual component. The sausage gravy spooned freely over both the biscuits and the hash browns – another specifically excellent combination that the biscuits and gravy recipe also notes.

Hash Browns FAQ
The single most common cause: insufficient moisture removal. Review the full technique: kitchen towel wring (firm, multiple times) plus paper towel pat. Test for dryness by pressing the shreds between two paper towels – they should leave only a slight dampness, not a wet spot. Secondary causes: too high heat (burns exterior before interior cooks, produces dense rather than crispy texture when the moisture eventually comes out), wrong potato type (waxy potatoes don’t crisp the same way), or too much potato in the pan (crowding produces steam rather than crisping).
Yes – with the same critical moisture-removal step. Frozen shredded potatoes (thawed thoroughly) carry significant surface moisture from the ice crystal formation and thawing process. They require even more aggressive moisture removal than fresh – thaw completely, then kitchen-towel wring (more forcefully and longer than with fresh), then paper towel pat. Skip the overnight-soak step (they’ve been soaked effectively during the freezing process). Add the cornstarch and seasonings and cook as directed. The frozen-potato hash brown is slightly less specifically good than the fresh-potato version but absolutely adequate when convenience is the priority.
Yes – preheat the oven to 425 degrees F. Line a baking sheet with parchment paper and brush with 1 tablespoon of oil. Place the formed hash brown patties on the oiled parchment, brush the tops with a small amount of oil, and bake for 20-25 minutes, flipping halfway through. The baked version produces crispier results on the top surface (from the oil brush and the oven’s direct heat) but the bottom surface is less specifically golden than the stovetop version. For cooking large batches for a group: the oven method handles multiple patties simultaneously without requiring batch cooking.
Two causes. First: they were flipped before the crust was fully set (before 5 minutes of undisturbed cooking). The set crust is what holds the patty together during flipping; a partially-formed crust tears. Second: the moisture wasn’t removed thoroughly enough, preventing the starch from forming the crust that binds the shreds. Both: wait the full 5 minutes and ensure thorough moisture removal. A properly made hash brown with sufficient moisture removed and 5 minutes of undisturbed cooking flips as a single, intact, golden disk with the spatula – it doesn’t fall apart.
Recipes You May Like
If these homemade hash browns have you building a collection of from-scratch skillet potato preparations that produce specifically crispy, specifically satisfying results from simple ingredients, here are three more from the blog in the same spirit.
Southern Fried Potatoes – The cube-format skillet potato companion that applies the same covered-then-uncovered cooking sequence to russet potato cubes with onion. Where the hash browns are the shredded, pressed-flat format that produces the maximum crispy surface area per serving, the Southern fried potatoes are the cube format that produces crispy exterior with a fluffy interior per cube. Both use russet potatoes in a cast-iron skillet with the covered-then-uncovered technique; the cut format and the eating experience are completely different.
Sweet Potato Home Fries – The sweeter, more colorful skillet potato companion for mornings when the hash brown’s savory, classic format should give way to a more specifically caramelized, naturally sweet preparation. Where the hash browns use russet for maximum starch and crispiness, the sweet potato home fries use orange-fleshed sweet potatoes for caramelized sweetness. Both use the same covered-then-uncovered cooking sequence; the flavor profile and the occasion are completely different.
Homemade Biscuits And Gravy – The Southern breakfast main course companion that pairs most naturally with hash browns. Where the hash browns provide the crispy, starchy side, the biscuits and gravy provide the creamy, rich, specifically Southern main component. Together they form the complete Southern breakfast spread – both are simple from-scratch preparations that specifically reward the technique attention they receive. My husband, who previously made soft hash browns, now makes both together for the complete Saturday morning version.
Conclusion
These homemade hash browns are crispy because the moisture was removed properly – kitchen-towel wring, paper-towel pat, proceed immediately. They hold together because the cornstarch absorbed what moisture remained and created the starch crust. They cook all the way through because the covered phase allowed steam to cook the interior. They flip cleanly because the 5-minute undisturbed crust was allowed to set before the spatula touched them.
Emily identified the crunch without being told. My husband identified the technique gap in his own method from watching once. “You actually have to get all the water out” is the entire technique in one sentence. That sentence is all you need to go from soft hash browns to crispy ones.
Tell me in the comments whether you tried the cheesy version or the loaded hash brown direction, and whether the full moisture-removal technique produced a noticeably different result than what you’d been making before. Save this to Pinterest for your next weekend breakfast, brunch spread, or any morning that calls for a specifically crispy potato alongside the eggs – and happy cooking!
Happy cooking! – Callie
Crispy Homemade Hash Browns Recipe

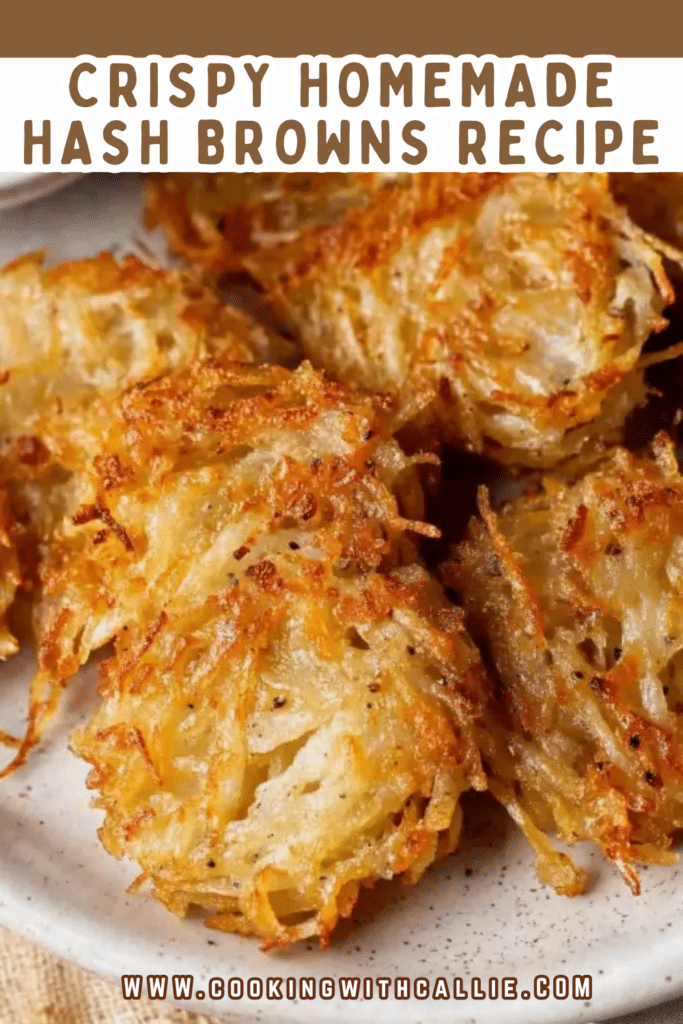
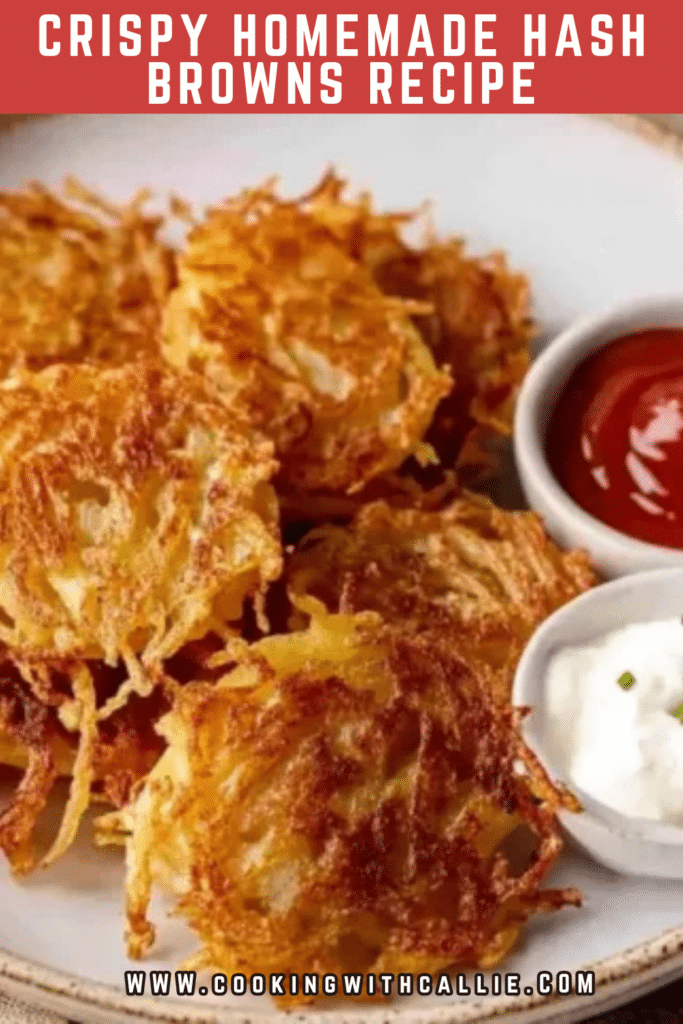
Crispy homemade hash browns with a golden-brown crust and a soft, fluffy interior. Made with just a handful of ingredients, these easy stovetop hash browns are perfectly seasoned and irresistibly crunchy. A simple, delicious addition to any breakfast or brunch spread.
- Prep Time: 10 minutes
- Cook Time: 15 minutes
- Total Time: 25 minutes
- Yield: 4 servings 1x
- Category: Breakfast
- Method: Stovetop
- Cuisine: American
- Diet: Vegan
Ingredients
- 2 medium Russet potatoes, peeled
- 2 tablespoons cornstarch (or all-purpose flour)
- ½ teaspoon garlic powder
- ¼ teaspoon onion powder
- ½ teaspoon salt
- ¼ teaspoon ground black pepper
- 2 tablespoons vegetable oil
Instructions
- Grate the peeled potatoes using the largest holes of a box grater. Squeeze out as much moisture as possible using a cheesecloth or your hands, then pat dry with a paper towel.
- In a large mixing bowl, toss the shredded potatoes with cornstarch, garlic powder, onion powder, salt, and pepper until well coated.
- Heat the vegetable oil in a large skillet over medium heat until sizzling, about 1-2 minutes.
- Take a handful of the potato mixture and gently press it into a ball. Place it in the skillet and flatten into a patty about ¼ to ⅓-inch thick. Repeat with the remaining mixture, cooking in batches if necessary.
- Cover with a lid and cook undisturbed for 5 minutes, until golden brown on the bottom. If browning too quickly, reduce the heat slightly.
- Flip the hash browns carefully with a spatula and cook uncovered for another 3-4 minutes until golden brown on both sides.
- Serve warm with your favorite condiments.

Notes
- Storage: Store cooled hash browns in an airtight container in the fridge for up to 5 days.
- Reheating: Reheat in a skillet over medium-high heat until crispy or in an air fryer at 400°F for 5 minutes.
- Freezing: Freeze on a lined baking sheet for 1 hour before transferring to a freezer-safe bag. Store for up to 3 months.
Nutrition
- Serving Size: 1 serving
- Calories: 210
- Sugar: 1g
- Sodium: 320mg
- Fat: 10g
- Saturated Fat: 1g
- Unsaturated Fat: 8g
- Trans Fat: 0g
- Carbohydrates: 28g
- Fiber: 3g
- Protein: 3g
- Cholesterol: 0mg