

This post may contain affiliate links. For more information, see our Affiliate Disclosure Policy.
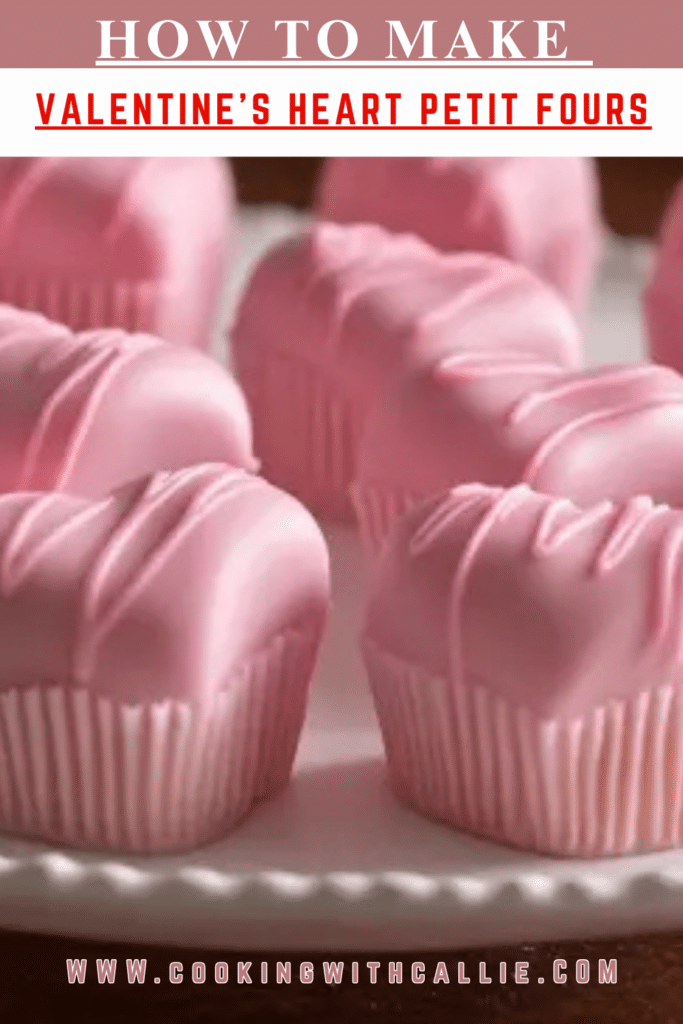
There’s something about Valentine’s Heart Petit Fours that makes people gasp a little when they see them. These dainty, elegant bite-sized cakes covered in that glossy pink icing just scream “special occasion,” and honestly, they’re way easier to make than most people think. I remember the first time I attempted petit fours for my daughter’s birthday party. I was terrified. I’d seen them in fancy bakery windows and assumed they required some kind of culinary degree to pull off. Spoiler alert: they don’t.
The thing is, once you understand the basic technique of layering, chilling, cutting, and glazing, you’ve got a skill that transfers to so many other desserts. My first batch wasn’t perfect – the icing was a little lumpy and I definitely drizzled way too much chocolate on top – but my family devoured them anyway. By my third attempt, I had the process down and now I make these every February without even looking at the recipe.
These petit fours are soft, delicate, and have that melt-in-your-mouth quality that makes fancy desserts so irresistible. The cream cheese filling adds a subtle tanginess that cuts through the sweetness, and the candy melt drizzle gives them a professional finish that looks like it belongs in a patisserie. Whether you’re making them for a romantic dinner, a Galentine’s Day celebration, or a bridal shower, they’re guaranteed to impress. If you love adorable Valentine’s treats, you should also check out my Pink Velvet Cupcakes for another stunning dessert option.
Why You Will Love This Recipe
- Impressive presentation with approachable technique – These look like they came from a professional bakery, but the step-by-step process is totally doable for home bakers
- Perfect portion size – Each petit four is just two or three bites, making them ideal for dessert tables where people want to try a little of everything
- Make-ahead friendly – You can prepare these a day or two in advance, which is a lifesaver when you’re hosting
- Completely customizable – Change up the cake flavor, filling, icing color, or decorations to match any theme or holiday
- Great for gifting – Package them in pretty boxes with tissue paper for an elegant homemade gift that looks store-bought
- Teaches valuable techniques – The skills you learn here (glazing, drizzling, precision cutting) apply to so many other desserts
- Delicate flavor balance – The combination of light sponge cake, creamy filling, and sweet glaze creates a sophisticated taste experience
- Less waste than you’d think – Those cake scraps from cutting? Perfect for cake pops or trifle
Valentine’s Heart Petit Fours Ingredients
Petit Four Cake Base
- 1 prepared Petit Four Cake – You can use my recipe and tutorial, or substitute a store-bought pound cake
- 1 cup cream cheese frosting – Homemade or store-bought works fine
Pourable Petit Four Icing
- 2 cups powdered sugar, sifted
- 1/4 cup whole milk, at room temperature
- 1 teaspoon pure vanilla extract
- 1 drop pink gel food coloring
Decorating
- 1/2 cup pink candy melts
- Cupcake liners for presentation
- Heart-shaped cookie cutter (approximately 1.5 to 2 inches)
Ingredient Notes and Selection Tips
The cake base is the foundation of your petit fours, so it matters more than you might think. A dense, fine-crumbed cake like pound cake or a traditional petit four sponge works best because it holds its shape when cut and doesn’t crumble apart when you pour the icing over it. Light, airy cakes like angel food will collapse under the weight of the glaze.
For the powdered sugar, please take the extra minute to sift it. I know it feels like an unnecessary step, but lumpy powdered sugar creates lumpy icing, and lumpy icing doesn’t pour smoothly. Trust me on this one – I’ve learned the hard way.
Gel food coloring is essential here. Liquid food coloring requires so much product to achieve a pretty pink that it thins out your icing consistency. With gel, one tiny drop gives you that perfect blush pink without affecting the texture at all.
Callie’s Kitchen Note: I once tried using liquid food coloring because I was out of gel, and my icing turned into pink milk. I had to add so much extra powdered sugar to fix it that the final product was way too sweet. Now I keep a full set of gel colors in my baking drawer at all times – lesson very much learned.
Possible Substitutions
- Store-bought pound cake works beautifully if you’re short on time – just slice it horizontally into thin layers before filling
- Buttercream frosting or raspberry jam can replace cream cheese frosting for different flavor profiles
- White chocolate chips tinted with oil-based food coloring can substitute for candy melts
- Almond extract (1/2 teaspoon) can replace vanilla for a more sophisticated flavor
- Beet juice or freeze-dried raspberry powder mixed into the icing creates natural pink color without artificial dyes

How To Make Valentine’s Heart Petit Fours
Preparing and Filling the Cake
- Bake your petit four cake according to your chosen recipe, then allow it to cool completely on a wire cooling rack. This step is crucial – a warm cake will melt your frosting and make cutting impossible.
- Once cooled, use a long serrated knife to level the top of your cake if it domed during baking. You want flat, even layers.
- If your cake isn’t already layered, slice it horizontally into two even layers. A turntable makes this easier, but you can also use toothpicks around the sides as guides.
- Spread an even layer of cream cheese frosting over the bottom cake layer, about 1/4 inch thick. Don’t go too heavy here – the filling should complement the cake, not overpower it.
- Place the second cake layer on top and press down gently to adhere.
- Transfer the filled cake to the freezer for 15-20 minutes. This is the secret to clean cuts – semi-frozen cake slices like a dream.
Why We Chill Before Cutting
I cannot stress enough how important this freezing step is. Room temperature cake compresses when you push a cookie cutter through it, leaving you with misshapen hearts and jagged edges. A chilled cake holds its structure and gives you those picture-perfect shapes that make petit fours so stunning. Don’t skip this!
Cutting the Heart Shapes
- Remove the cake from the freezer. It should feel firm but not rock-solid.
- Dip your heart-shaped cookie cutter in hot water, then dry it quickly. This helps it glide through the cake more smoothly.
- Press the cutter straight down through both layers of cake, twisting slightly at the bottom.
- Gently push the heart shape out from the bottom of the cutter. If it sticks, use a small offset spatula to help release it.
- Wipe the cookie cutter clean between each cut to prevent buildup from affecting your next shape.
- Arrange your cut hearts on a parchment-lined baking sheet and return them to the freezer while you prepare the icing.
Callie’s Kitchen Note: After cutting, you’ll have quite a bit of cake scrap left over. Don’t throw it away! I crumble mine into a bowl, mix with a little extra frosting, and roll them into cake pops. Nothing goes to waste in my kitchen, and my kids think the “bonus” cake pops are the best part of the whole process.
Preparing the Pourable Icing
- In a medium bowl, sift the powdered sugar to remove any lumps.
- Add the room temperature milk and vanilla extract. Whisk until completely smooth. The consistency should be like thick honey – it should pour slowly but coat the back of a spoon.
- Add one drop of pink gel food coloring and whisk until the color is uniform throughout.
- If your icing is too thick, add milk one teaspoon at a time. If it’s too thin, add more sifted powdered sugar.
Getting the Perfect Icing Consistency
The icing consistency is everything with petit fours. Too thick and it won’t flow smoothly over your cakes, leaving you with globs and bare spots. Too thin and it’ll run right off, pooling at the bottom instead of coating the sides. I test mine by lifting the whisk and watching how the icing falls – it should flow in a steady ribbon that holds its shape for a second before melting back into the bowl.
Icing the Petit Fours
- Set up your glazing station: place a wire cooling rack over a rimmed baking sheet lined with parchment paper or foil. This catches the drips for easy cleanup.
- Remove the hearts from the freezer and place them on the cooling rack, spacing them at least 2 inches apart.
- Pour icing over each heart, starting from the center and letting it flow down the sides naturally. Use a spoon to guide it if needed.
- If any sides have bare spots, use a small offset spatula or the back of a spoon to gently spread the icing over those areas.
- Let the icing set for 2-3 minutes before adding the chocolate drizzle. It should feel dry to a light touch.
Callie’s Kitchen Note: The icing that drips onto your baking sheet can be scraped up and reused as long as there aren’t cake crumbs in it. I just pour it back into my bowl through a fine mesh strainer. It feels wasteful to throw away all that sugary goodness, and it works perfectly fine the second time around.
Adding the Candy Melt Drizzle
- Place your pink candy melts in a microwave-safe bowl or a disposable piping bag.
- Microwave in 30-second intervals, stirring or massaging between each, until completely smooth. Be careful not to overheat – candy melts seize up easily.
- If using a bowl, transfer the melted candy to a piping bag or zip-top bag. Snip a very small opening at the tip – you want thin, delicate lines.
- Hold the bag about 6 inches above the petit fours and drizzle in a zig-zag motion across each heart.
- Allow the candy melt to set completely, about 5 minutes at room temperature or 2 minutes in the refrigerator.
- Carefully transfer each petit four to a decorative cupcake liner for serving or gifting.
Common Mistakes To Avoid
Not chilling the cake long enough – This is by far the most common issue I see. If your cake is too soft, your hearts will look more like lumpy blobs than elegant shapes. Give it a full 15-20 minutes in the freezer. When you press on it, it should feel firm but not frozen solid.
Making icing too thin – I know it’s tempting to add extra milk to make the icing pour more easily, but thin icing doesn’t coat properly. It runs off the petit fours and pools at the bottom, leaving you with bare spots on top and thick puddles underneath.
Overheating the candy melts – Candy melts are finicky. They go from smooth to seized and grainy in seconds if you overheat them. Always microwave in short bursts and stir frequently. If yours do seize, you can sometimes save them by adding a tiny bit of vegetable oil and stirring vigorously.
Skipping the leveling step – A domed cake means uneven petit fours. Take the time to level your cake with a serrated knife so all your hearts are the same height.
Using a dull or dirty cookie cutter – A cutter with buildup on it drags through the cake instead of slicing cleanly. Keep a damp paper towel nearby and wipe it between every few cuts.
Storage And Reheating
Storing Finished Petit Fours
These petit fours store beautifully in an airtight container in the refrigerator for up to 5 days. The icing actually improves after a day – it sets more firmly and develops a slight crust that I find really satisfying.
For longer storage, arrange the petit fours in a single layer on a baking sheet and freeze until solid (about 2 hours). Then transfer to a freezer-safe container, separating layers with parchment paper to prevent sticking. They’ll keep frozen for up to 3 months.
Bringing to Room Temperature
For the best flavor and texture, remove refrigerated petit fours about 20-30 minutes before serving. The cake tastes better when it’s not ice cold, and the frosting becomes creamier.
For frozen petit fours, transfer to the refrigerator the night before you need them, then bring to room temperature before serving.
A Note on Food Safety
The cream cheese filling means these should be refrigerated if not serving within 2 hours. According to food safety guidelines, cream cheese-based desserts shouldn’t sit at room temperature for extended periods, especially in warm environments.
Valentine’s Heart Petit Fours Variations
Chocolate Lovers Version – Use chocolate cake as your base, chocolate ganache as the filling, and pour chocolate glaze over top. Drizzle with white chocolate for a stunning contrast.
Raspberry Romance – Replace the cream cheese frosting with seedless raspberry jam. Add a drop of raspberry extract to the icing for a fruit-forward flavor that’s absolutely heavenly.
Lemon Bliss – Use lemon cake, lemon curd filling, and add lemon zest to the icing. The bright citrus flavor is perfect for spring celebrations.
Red Velvet Hearts – Start with red velvet cake and cream cheese frosting (the classic combo), then ice with white or pale pink glaze.
Champagne Celebration – Replace the milk in your icing with champagne or sparkling wine for a boozy, sophisticated twist perfect for adult gatherings.
Natural Pink – For a no-artificial-dye option, use freeze-dried strawberry powder or beet juice to tint your icing. The color is gorgeous and adds a subtle fruity note.
Callie’s Kitchen Note: My personal favorite variation is adding 1/4 teaspoon of rose water to the icing. It gives the petit fours this delicate floral quality that feels so romantic and fancy. Just don’t overdo it – rose water is potent and too much tastes like perfume. Ask me how I know.
Serving Suggestions
Presentation Ideas
The way you present petit fours matters almost as much as how they taste. Individual cupcake liners (I love the metallic pink or red ones for Valentine’s Day) make each petit four feel special and keep fingers clean.
For a gift, arrange 6-8 petit fours in a clear bakery box lined with tissue paper. Add a ribbon and gift tag for an elegant presentation that looks like it came from a French patisserie.
For a dessert table, display them on a tiered cake stand with fresh flowers or scattered rose petals around the base. The height variation draws the eye and makes the spread look more abundant.
Pairing Suggestions
These petit fours pair beautifully with fresh berries – strawberries, raspberries, or blackberries complement the sweetness without competing with it.
For beverages, Earl Grey tea or chamomile work wonderfully with the delicate flavors. If you’re serving for a celebration, sparkling rose or champagne matches the romantic vibe perfectly. Kids love these with strawberry lemonade or hot chocolate.
Occasion Ideas
Beyond Valentine’s Day, these heart-shaped treats are perfect for bridal showers, engagement parties, anniversaries, or Mother’s Day brunches. Change the color scheme (pastels for Easter, gold for anniversaries) and you’ve got a versatile dessert that works year-round.

Valentine’s Heart Petit Fours FAQ
Absolutely! A box cake mix works perfectly fine for petit fours. I’d recommend a white or yellow cake mix since they have a neutral flavor that pairs well with the sweet icing. The key is making sure your cake is dense enough – some box mixes produce very light, fluffy cakes that don’t hold up well when cut. If yours seems too airy, try reducing the oil by 2 tablespoons and baking at 325 degrees F instead of the temperature on the box. This creates a denser crumb that’s more traditional for petit fours.
This usually happens for one of two reasons. First, your icing might be too thin – it should coat the back of a spoon without dripping off immediately. Add more sifted powdered sugar until you reach that thick honey consistency. Second, your petit fours might not be cold enough. The chilled cake acts as a “magnet” for the icing, helping it grip and set. If your cakes have warmed up while you were preparing the icing, pop them back in the freezer for 5 minutes before glazing.
You can make petit fours up to 3 days ahead if stored properly in the refrigerator. They actually taste better after sitting for a day because the flavors meld together and the icing sets more firmly. For longer lead time, freeze the uniced petit four hearts for up to a month, then thaw and ice them the day before you need them. I don’t recommend freezing already-iced petit fours as the icing can get a bit sticky when thawed.
So many things! My favorite is making cake pops – crumble the scraps, mix with a little frosting until it holds together, roll into balls, chill, and dip in candy melts. You can also use them as the base for a trifle by layering crumbles with pudding and whipped cream. Or just eat them with a fork like I sometimes do when no one’s watching. They’re perfectly delicious even if they’re not heart-shaped.
You can, but it changes the technique entirely. Fondant needs to be rolled out and draped over each petit four individually, then trimmed – it’s much more labor-intensive than pourable icing. Fondant also has a different texture (chewy rather than crisp) and a different taste that some people don’t love. If you want that ultra-smooth professional look, fondant works well, but pourable icing is more traditional for petit fours and much faster for home bakers.
Candy melts are very sensitive to moisture and overheating. Even a tiny drop of water can cause them to seize. Make sure your bowl and utensils are completely dry before you start. Overheating is the other culprit – always microwave in short 30-second bursts and stir between each. If they do seize, try adding 1/2 teaspoon of vegetable oil and stirring vigorously – sometimes you can save them. If not, start with fresh candy melts and be more careful with the timing.
Recipes You May Like
Looking for more elegant Valentine’s Day treats? Here are some of my favorites that would look beautiful alongside these petit fours:
- Valentine’s Day Macarons – These delicate French cookies with a creamy filling are another stunning addition to any dessert spread and pair perfectly with petit fours
- Sweetheart Cinnamon Rolls – Heart-shaped cinnamon rolls that are perfect for Valentine’s morning breakfast in bed
- Pink Champagne Cupcakes From Scratch – Elegant, boozy cupcakes that share that same sophisticated vibe as petit fours
Conclusion
These Valentine’s Heart Petit Fours are truly a labor of love, but I promise the effort is worth it when you see the look on someone’s face as they bite into one. There’s something about these dainty little cakes that makes people feel special, like you went the extra mile just for them. And you did – but it wasn’t as hard as they think.
The first time might feel a little clunky as you figure out the icing consistency and drizzling technique, but by your second or third batch, it becomes muscle memory. And once you’ve mastered petit fours, you’ve basically leveled up your baking game for good.
I’d love to hear how yours turn out! Drop a comment below or tag me on social media with your creations. And don’t forget to save this recipe to Pinterest so you can find it when Valentine’s Day rolls around next year.
Happy baking!
Callie

How to Make Valentine’s Heart Petit Fours

Valentine’s Heart Petit Fours are adorable bite-sized treats, perfect for celebrating love. These heart-shaped cakes are layered with creamy frosting, coated in smooth pink icing, and drizzled with decorative candy melts. They’re a show-stopping dessert for Valentine’s Day or any special occasion.
- Prep Time: 30 minutes
- Cook Time: 25 minutes
- Total Time: 1 hour 10 minutes including chill time
- Yield: 12–15 petit fours 1x
- Category: Dessert
- Method: Baking
- Cuisine: French-inspired
- Diet: Vegetarian
Ingredients
For the Petit Four Cake:
- 1 cup unsalted butter, softened
- 1 cup granulated sugar
- 4 large eggs
- 2 cups all-purpose flour
- 1 tsp baking powder
- ½ cup milk
- 1 tsp vanilla extract
For the Filling:
- 1 cup cream cheese frosting (store-bought or homemade)
For the Icing:
- 2 cups powdered sugar
- ¼ cup milk
- 1 tsp vanilla extract
- 1 drop pink gel food coloring
For Decoration:
- ½ cup pink candy melts
- Cupcake liners for serving
Instructions
- Prepare the Cake: Preheat your oven to 350°F (175°C). Grease and line a baking sheet with parchment paper. Cream butter and sugar until light and fluffy, then add eggs one at a time. Fold in flour, baking powder, milk, and vanilla until smooth. Pour the batter into the pan and bake for 20-25 minutes or until a toothpick comes out clean. Let cool completely.
- Fill the Cake: Once cooled, slice the cake in half horizontally and spread a thin layer of cream cheese frosting between layers. Chill in the freezer for 10-15 minutes for easier cutting.
- Cut Heart Shapes: Use a small heart-shaped cookie cutter to cut out shapes from the cake. Gently press from the bottom to remove them cleanly.
- Make the Icing: In a bowl, whisk together powdered sugar, milk, and vanilla until smooth. Add a drop of pink gel food coloring and mix well to achieve a pastel pink shade.
- Coat the Petit Fours: Place heart-shaped cakes on a cooling rack. Pour icing over each heart, letting it drip down the sides. Allow the icing to set for 1-2 minutes.
- Decorate: Melt pink candy melts in a microwave-safe piping bag, snip the end, and drizzle over the petit fours. Let them set before serving.
- Serve: Place each petit four in a cupcake liner and enjoy.




Notes
- Chilling the cake before cutting helps achieve cleaner shapes.
- If icing is too thin, add more powdered sugar to thicken it.
- Store petit fours in an airtight container in the refrigerator for up to 5 days.
Nutrition
- Serving Size: 1 petit four
- Calories: 210 kcal
- Sugar: 22g
- Sodium: 75mg
- Fat: 10g
- Saturated Fat: 6g
- Unsaturated Fat: 3g
- Trans Fat: 0g
- Carbohydrates: 28g
- Fiber: 0.5g
- Protein: 3g
- Cholesterol: 45mg





On the design that has pink edges and white tops, how did you do it? Did you pipe pink icing on the sides? It doesn’t look like they were dipped, it looks like the white is the bottom layer and you put a layer of pink on the sides. Thanks
Hi.
What size baking sheet are you using?
Regards
Anne