This post may contain affiliate links. For more information, see our Affiliate Disclosure Policy.
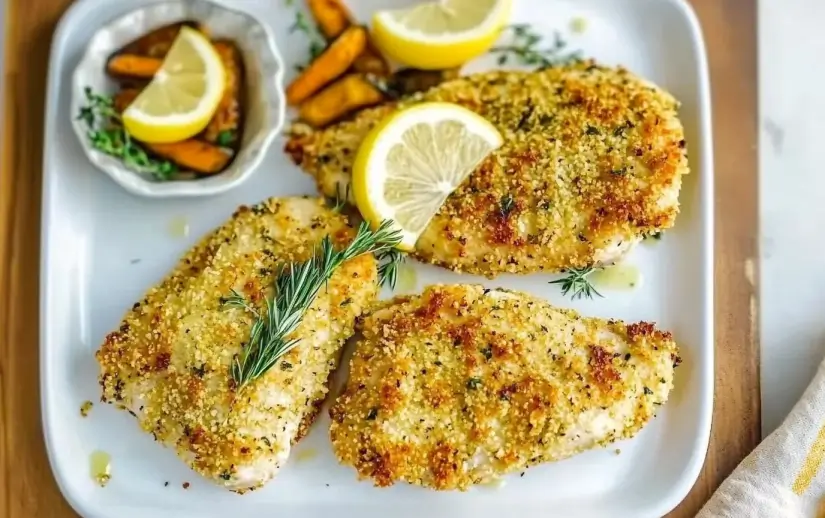
If you’re looking for a quick and delicious dinner that feels gourmet without the effort, this Lemon Pepper Panko Crusted Chicken is your new go-to recipe. With just 30 minutes from start to finish, you get a perfectly crispy, golden-brown crust with a bright, zesty lemon pepper flavor. Plus, it’s baked (or air-fried!) for a healthier twist on classic fried chicken.

Why You’ll Love This Recipe
Key Benefits
- Quick & Easy – Ready in just 30 minutes with minimal prep
- Healthy – Baked or air-fried, no deep frying needed
- Family-Friendly – A dish everyone will love, from kids to adults
- Meal Prep Friendly – Store leftovers and reheat for another easy meal
Taste & Texture
- Crispy & Crunchy – Thanks to the panko breadcrumbs, this chicken has an irresistible texture
- Bright & Zesty – The fresh lemon juice and lemon pepper seasoning add a vibrant, citrusy flavor
- Juicy & Tender – Baked to perfection, the chicken stays moist and flavorful
Dietary Attributes
- Naturally gluten-free option – Use gluten-free panko
- High-protein – Packed with 25g of protein per serving
- Low-calorie – Only 203 calories per serving
Ingredients & Substitutions
Ingredient List
- 1½ pounds boneless, skinless chicken breasts (or cutlets)
- 2 tablespoons avocado oil, olive oil, or melted butter
- ¼ cup lemon juice (approx. 1 large or two small lemons)
- ½ cup Italian-seasoned panko or gluten-free panko
- 1 tablespoon lemon pepper seasoning
- 1 teaspoon garlic powder
- ½ teaspoon fine ground sea salt
- ¼ teaspoon ground black pepper
Optional Garnish:
- 1 lemon, cut into slices
- ¼ cup chopped flat-leaf parsley
Notes on Quality
- Fresh lemons make a difference—bottled lemon juice won’t have the same bright flavor
- Panko breadcrumbs create a crispier texture compared to regular breadcrumbs
- Use thin chicken breasts or cutlets for even cooking
Possible Substitutions
- Chicken thighs instead of breasts for a juicier option
- Gluten-free panko for a celiac-friendly version
- Lime juice instead of lemon for a slightly different citrus twist
Step-by-Step Instructions
Prep Work
- Preheat oven to 375ºF
- Line a 9×13-inch baking dish or rimmed sheet pan with aluminum foil and lightly grease with nonstick spray or oil
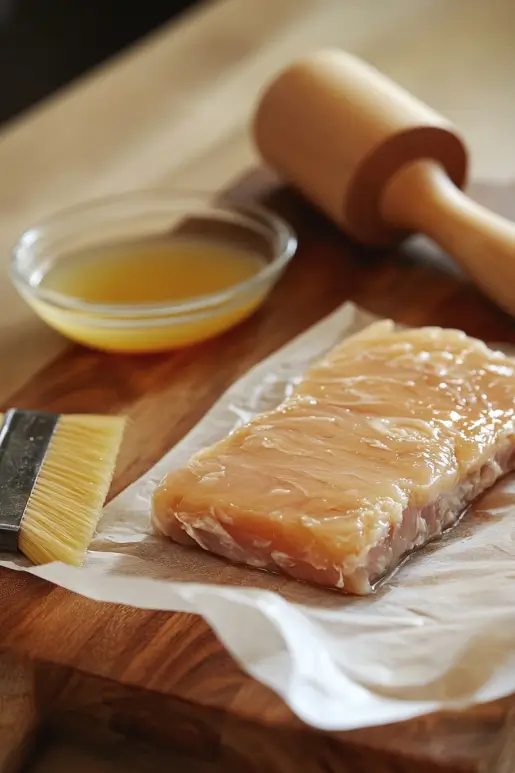
Coating the Chicken
- Place chicken breasts between sheets of wax paper or plastic wrap
- Using a meat mallet or rolling pin, gently pound to even thickness for uniform cooking
- Mix oil and lemon juice, then brush onto both sides of the chicken
Breading the Chicken
- In a gallon-size Ziploc bag, breading tray, or pie plate, mix panko, lemon pepper seasoning, garlic powder, salt, and black pepper
- Coat each chicken breast in the panko mixture, pressing gently to adhere
Baking Instructions
- Arrange chicken in a single layer in the prepared baking dish
- Bake for 12 minutes, then flip the chicken and continue baking for another 12-15 minutes until golden brown
- Use an instant-read thermometer to check for an internal temperature of 163°F
- Let the chicken rest for 5 minutes before serving, allowing carryover cooking to bring it to 165°F
Air Fryer Instructions
- Preheat the air fryer to 350ºF
- Add the panko-coated chicken to the air fryer basket in a single layer
- Air fry for 18-20 minutes, flipping halfway, until golden and crisp
- Check for an internal temperature of 163°F, then let rest for 5 minutes before serving
Expert Tips & Tricks
Best Practices
- Pound chicken to even thickness – Ensures even cooking and prevents dryness
- Press panko onto the chicken firmly – Helps the crust stay crisp and intact
- Use a thermometer – The most reliable way to check for doneness
Common Mistakes
- Skipping the oil/lemon juice mix – This helps the breading stick and adds flavor
- Not flipping the chicken – Flipping ensures both sides crisp up evenly
- Overcooking – Pull the chicken out at 163°F since it will continue cooking as it rests
Time-Saving Tips
- Use pre-cut chicken cutlets instead of whole breasts
- Make the panko seasoning mix in advance and store for future use
- Use an air fryer for a faster cook time with extra crispiness
Serving Suggestions
Pairings
- Serve with Sheet Pan Gnocchi for a complete meal
- Pair with roasted veggies like asparagus, green beans, or Brussels sprouts
- Add a side of garlic mashed potatoes for a comforting, hearty dinner
Presentation Ideas
- Garnish with fresh lemon slices and parsley for a bright, elegant touch
- Serve on a white plate for a beautiful contrast with the golden crust
Beverage Pairings
- White wine – A crisp Sauvignon Blanc or Chardonnay complements the lemony flavors
- Sparkling water with lemon – A refreshing, non-alcoholic option
Storage & Reheating
Leftover Storage
- Store in an airtight container in the fridge for up to 4 days
- Freeze for up to 3 months in a sealed bag or container
Reheating Methods
- Oven: Reheat at 350°F for 5-10 minutes, broiling at the end for crispiness
- Air Fryer: Set to 350°F for 3-5 minutes for best results
- Microwave: Not recommended—it softens the crispy crust
Frequently Asked Questions
Substitutions & Adjustments
Can I use regular breadcrumbs instead of panko?
Yes, but the texture will be less crispy.
What if I don’t have lemon pepper seasoning?
Mix black pepper, dried lemon zest, and a pinch of salt for a DIY version.
Troubleshooting
Why didn’t my chicken get crispy?
Make sure you press the panko firmly onto the chicken and bake at the right temperature.
What if my chicken is dry?
Check the internal temperature and avoid overcooking.
Variations & Customizations
Dietary Adaptations
- Make it gluten-free by using gluten-free panko
- Dairy-free? Skip the butter and use oil
Flavor Twists
- Add Parmesan cheese to the panko for a richer taste
- Sprinkle red pepper flakes for a spicy kick
Seasonal/Holiday Versions
- Serve with roasted butternut squash in the fall
- Add fresh herbs like thyme or rosemary for a winter variation
Conclusion
This Lemon Pepper Panko Crusted Chicken is crispy, zesty, and incredibly easy to make. Whether baked or air-fried, it’s a quick dinner that never fails to impress. Try it for your next meal, and let me know how it turns out in the comments. Don’t forget to pin this recipe on Pinterest for later.
For more delicious chicken recipes, check out Creamy Chicken Marsala, or explore another easy 30-minute meal like Sheet Pan Gnocchi. Happy cooking!


Lemon Pepper Panko Crusted Chicken: Crispy, Flavorful, and Easy!
- Total Time: 30 minutes
- Yield: 6 servings 1x
- Diet: Low Fat
Description
This Lemon Pepper Panko Crusted Chicken is crispy, zesty, and baked to golden perfection in just 30 minutes! Made with panko breadcrumbs, fresh lemon juice, and a flavorful seasoning blend, it delivers a crunchy texture while keeping the chicken juicy and tender. Enjoy it as a healthy, family-friendly dinner that’s easy to make and even easier to love!
Ingredients
- 1½ pounds boneless, skinless chicken breasts (6 breasts, 4 ounces each) or cutlets
- 2 tablespoons avocado oil, olive oil, or melted butter
- ¼ cup lemon juice (approx. 1 large or two small lemons)
- ½ cup Italian seasoned panko (or gluten-free panko)
- 1 tablespoon lemon pepper seasoning
- 1 teaspoon garlic powder
- ½ teaspoon fine ground sea salt
- ¼ teaspoon ground black pepper
Optional Garnish:
- 1 lemon, cut into slices
- ¼ cup chopped flat-leaf parsley
Instructions
1️⃣ Preheat & Prep:
- Preheat oven to 375ºF.
- Line a 9×13-inch baking dish or rimmed sheet pan with aluminum foil and lightly grease.
2️⃣ Prepare the Chicken:
- Place chicken breasts between wax paper or plastic wrap.
- Gently pound them with a meat mallet or rolling pin to ensure even thickness.
3️⃣ Coat the Chicken:
- In a small bowl, mix oil and lemon juice, then brush onto both sides of the chicken.
- In a separate dish, combine panko, lemon pepper seasoning, garlic powder, salt, and black pepper.
- Coat each chicken breast in the panko mixture, pressing gently to adhere.
4️⃣ Bake the Chicken:
- Arrange chicken in a single layer in the prepared baking dish.
- Bake for 12 minutes, flip, and continue baking for another 12-15 minutes until crispy and golden brown.
- Use an instant-read thermometer to check for an internal temp of 163°F.
5️⃣ Rest & Serve:
- Let chicken rest for 5 minutes to reach 165°F before serving.
- Garnish with lemon slices and fresh parsley, then enjoy!
Air Fryer Method:
- Preheat air fryer to 350ºF.
- Air fry for 18-20 minutes, flipping halfway.
- Let rest for 5 minutes before serving.


Notes
- Carryover cooking: The chicken will continue to cook after removing from the oven, reaching a final temp of 165°F.
- For extra crispiness, broil for the last 2-3 minutes.
- Storage: Keep leftovers in the fridge for up to 4 days.
- Reheat: In the oven at 350°F for 5-10 minutes, or 3-5 minutes in an air fryer for best results.
- Prep Time: 5 minutes
- Cook Time: 25 minutes
- Category: Entree
- Method: Baked / Air Fried
- Cuisine: American
Nutrition
- Serving Size: 4 ounces
- Calories: 203 kcal
- Sugar: 1g
- Sodium: 364mg
- Fat: 8g
- Saturated Fat: 1g
- Unsaturated Fat: 5g
- Trans Fat: 0g
- Carbohydrates: 7g
- Fiber: 1g
- Protein: 25g
- Cholesterol: 73mg